
Chapter Two Memory Access and Organization
2.1 Chapter Overview
In earlier chapters you saw how to declare and access simple variables in an assembly language program. In this chapter you will learn how the 80x86 CPUs actually access memory (e.g., variables). You will also learn how to efficiently organize your variable declarations so the CPU can access them faster. In this chapter you will also learn about the 80x86 stack and how to manipulate data on the stack with some 80x86 instructions this chapter introduces. Finally, you will learn about dynamic memory allocation.
2.2 The 80x86 Addressing Modes
The 80x86 processors let you access memory in many different ways. Until now, you've only seen a single way to access a variable, the so-called displacement-only addressing mode that you can use to access scalar variables. Now it's time to look at the many different ways that you can access memory on the 80x86.
The 80x86 memory addressing modes provide flexible access to memory, allowing you to easily access variables, arrays, records, pointers, and other complex data types. Mastery of the 80x86 addressing modes is the first step towards mastering 80x86 assembly language.
When Intel designed the original 8086 processor, they provided it with a flexible, though limited, set of memory addressing modes. Intel added several new addressing modes when it introduced the 80386 microprocessor. Note that the 80386 retained all the modes of the previous processors. However, in 32-bit environments like Win32, BeOS, and Linux, these earlier addressing modes are not very useful; indeed, HLA doesn't even support the use of these older, 16-bit only, addressing modes. Fortunately, anything you can do with the older addressing modes can be done with the new addressing modes as well (even better, as a matter of fact). Therefore, you won't need to bother learning the old 16-bit addressing modes on today's high-performance processors. Do keep in mind, however, that if you intend to work under MS-DOS or some other 16-bit operating system, you will need to study up on those old addressing modes.
2.2.1 80x86 Register Addressing Modes
Most 80x86 instructions can operate on the 80x86's general purpose register set. By specifying the name of the register as an operand to the instruction, you may access the contents of that register. Consider the 80x86 MOV (move) instruction:
mov( source, destination );This instruction copies the data from the source operand to the destination operand. The eight-bit, 16-bit, and 32-bit registers are certainly valid operands for this instruction. The only restriction is that both operands must be the same size. Now let's look at some actual 80x86 MOV instructions:
	mov( bx, ax );					// Copies the value from BX into AX

	mov( al, dl );					// Copies the value from AL into DL

	mov( edx, esi ); 					// Copies the value from EDX into ESI

	mov( bp, sp );					// Copies the value from BP into SP

	mov( cl, dh );					// Copies the value from CL into DH

	mov( ax, ax );					// Yes, this is legal!
Remember, the registers are the best place to keep often used variables. As you'll see a little later, instructions using the registers are shorter and faster than those that access memory. Throughout this chapter you'll see the abbreviated operands reg and r/m (register/memory) used wherever you may use one of the 80x86's general purpose registers.
2.2.2 80x86 32-bit Memory Addressing Modes
The 80x86 provides hundreds of different ways to access memory. This may seem like quite a bit at first, but fortunately most of the addressing modes are simple variants of one another so they're very easy to learn. And learn them you should! The key to good assembly language programming is the proper use of memory addressing modes.
The addressing modes provided by the 80x86 family include displacement-only, base, displacement plus base, base plus indexed, and displacement plus base plus indexed. Variations on these five forms provide the many different addressing modes on the 80x86. See, from 256 down to five. It's not so bad after all!
2.2.2.1 The Displacement Only Addressing Mode
The most common addressing mode, and the one that's easiest to understand, is the displacement-only (or direct) addressing mode. The displacement-only addressing mode consists of a 32 bit constant that specifies the address of the target location. Assuming that variable J is an int8 variable allocated at address $8088, the instruction "mov( J, al );" loads the AL register with a copy of the byte at memory location $8088. Likewise, if int8 variable K is at address $1234 in memory, then the instruction "mov( dl, K );" stores the value in the DL register to memory location $1234 (see Figure 2.1).
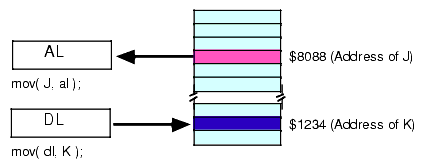
Figure 2.1 Displacement Only (Direct) Addressing Mode
The displacement-only addressing mode is perfect for accessing simple scalar variables.
Intel named this the displacement-only addressing mode because a 32-bit constant (displacement) follows the MOV opcode in memory. On the 80x86 processors, this displacement is an offset from the beginning of memory (that is, address zero). The examples in this chapter will typically access bytes in memory. Don't forget, however, that you can also access words and double words on the 80x86 processors (see Figure 2.2).
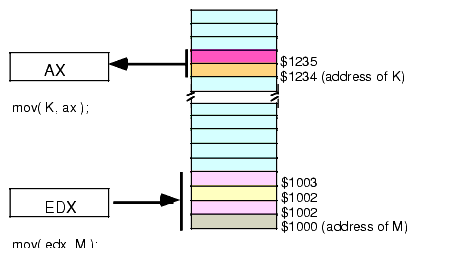
Figure 2.2 Accessing a Word or DWord Using the Displacement Only Addressing Mode
2.2.2.2 The Register Indirect Addressing Modes
The 80x86 CPUs let you access memory indirectly through a register using the register indirect addressing modes. The term indirect means that the operand is not the actual address, but rather, the operand's value specifies the memory address to use. In the case of the register indirect addressing modes, the register's value is the memory location to access. For example, the instruction "mov( eax, [ebx] );" tells the CPU to store EAX's value at the location whose address is in EBX (the square brackets around EBX tell HLA to use the register indirect addressing mode).
There are eight forms of this addressing mode on the 80x86, best demonstrated by the following instructions:
		mov( [eax], al );

		mov( [ebx], al );

		mov( [ecx], al );

		mov( [edx], al );

		mov( [edi], al );

		mov( [esi], al );

		mov( [ebp], al );

		mov( [esp], al );
These eight addressing modes reference the memory location at the offset found in the register enclosed by brackets (EAX, EBX, ECX, EDX, EDI, ESI, EBP, or ESP, respectively).
Note that the register indirect addressing modes require a 32-bit register. You cannot specify a 16-bit or eight-bit register when using an indirect addressing mode1. Technically, you could load a 32-bit register with an arbitrary numeric value and access that location indirectly using the register indirect addressing mode:
		mov( $1234_5678, ebx );

		mov( [ebx], al );								// Attempts to access location $1234_5678.
Unfortunately (or fortunately, depending on how you look at it), this will probably cause the operating system to generate a protection fault since it's not always legal to access arbitrary memory locations.
The register indirect addressing mode has lots of uses. You can use it to access data referenced by a pointer, you can use it to step through array data, and, in general, you can use it whenever you need to modify the address of a variable while your program is running.
The register indirect addressing mode provides an example of a anonymous variable. When using the register indirect addressing mode you refer to the value of a variable by its numeric memory address (e.g., the value you load into a register) rather than by the name of the variable. Hence the phrase anonymous variable.
HLA provides a simple operator that you can use to take the address of a STATIC variable and put this address into a 32-bit register. This is the "&" (address of) operator (note that this is the same symbol that C/C++ uses for the address-of operator). The following example loads the address of variable J into EBX and then stores the value in EAX into J using the register indirect addressing mode:
	mov( &J, ebx );							// Load address of J into EBX.

	mov( eax, [ebx] );							// Store EAX into J.
Of course, it would have been simpler to store the value in EAX directly into J rather than using two instructions to do this indirectly. However, you can easily imagine a code sequence where the program loads one of several different addresses into EBX prior to the execution of the "mov( eax, [ebx]);" statement, thus storing EAX into one of several different locations depending on the execution path of the program.
Warning: the "&" (address-of) operator is not a general address-of operator like the "&" operator in C/C++. You may only apply this operator to static variables2. It cannot be applied to generic address expressions or other types of variables. For more information on taking the address of such objects, see "Obtaining the Address of a Memory Object" on page 175.
2.2.2.3 Indexed Addressing Modes
The indexed addressing modes use the following syntax:
	mov( VarName[ eax ], al );

	mov( VarName[ ebx ], al );

	mov( VarName[ ecx ], al );

	mov( VarName[ edx ], al );

	mov( VarName[ edi ], al );

	mov( VarName[ esi ], al );

	mov( VarName[ ebp ], al );

	mov( VarName[ esp ], al );
VarName is the name of some variable in your program.
The indexed addressing mode computes an effective address3 by adding the address of the specified variable to the value of the 32-bit register appearing inside the square brackets. This sum is the actual address in memory that the instruction will access. So if VarName is at address $1100 in memory and EBX contains eight, then "mov( VarName[ ebx ], al );" loads the byte at address $1108 into the AL register (see Figure 2.3).
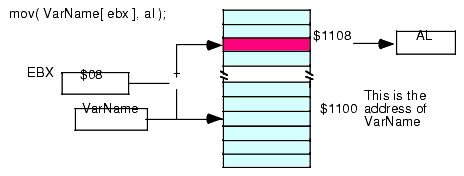
Figure 2.3 Indexed Addressing Mode
The indexed addressing mode is really handy for accessing elements of arrays. You will see how to use this addressing mode for that purpose a little later in this text. A little later in this chapter you will see how to use the indexed addressing mode to step through data values in a table.
2.2.2.4 Variations on the Indexed Addressing Mode
There are two important syntactical variations of the indexed addressing mode. Both forms generate the same basic machine instructions, but their syntax suggests other uses for these variants.
The first variant uses the following syntax:
	mov( [ ebx + constant ], al );

	mov( [ ebx - constant ], al );
These examples use only the EBX register. However, you can use any of the other 32-bit general purpose registers in place of EBX. This addressing mode computes its effective address by adding the value in EBX to the specified constant, or subtracting the specified constant from EBX (See Figure 2.4 and Figure 2.5).
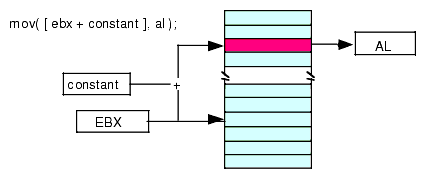
Figure 2.4 Indexed Addressing Mode Using a Register Plus a Constant
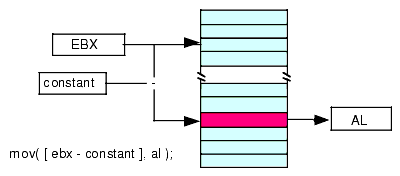
Figure 2.5 Indexed Addressing Mode Using a Register Minus a Constant
This particular variant of the addressing mode is useful if a 32-bit register contains the base address of a multi-byte object and you wish to access a memory location some number of bytes before or after that location. One important use of this addressing mode is accessing fields of a record (or structure) when you have a pointer to the record data. You'll see a little later in this text that this addressing mode is also invaluable for accessing automatic (local) variables in procedures.
The second variant of the indexed addressing mode is actually a combination of the previous two forms. The syntax for this version is the following:
	mov( VarName[ ebx + constant ], al );

	mov( VarName[ ebx - constant ], al );
Once again, this example uses only the EBX register. You may, however, substitute any of the 32-bit general purpose registers in place of EBX in these two examples. This particular form is quite useful when accessing elements of an array of records (structures) in an assembly language program (more on that in a few chapters).
These instructions compute their effective address by adding or subtracting the constant value from VarName and then adding the value in EBX to this result. Note that HLA, not the CPU, computes the sum or difference of VarName and constant. The actual machine instructions above contain a single constant value that the instructions add to the value in EBX at run-time. Since HLA substitutes a constant for VarName, it can reduce an instruction of the form
mov( VarName[ ebx + constant], al );to an instruction of the form:
mov( constant1[ ebx + constant2], al );Because of the way these addressing modes work, this is semantically equivalent to
mov( [ebx + (constant1 + constant2)], al );HLA will add the two constants together at compile time, effectively producing the following instruction:
mov( [ebx + constant_sum], al );So, HLA converts the first addressing mode of this sequence to the last in this sequence.
Of course, there is nothing special about subtraction. You can easily convert the addressing mode involving subtraction to addition by simply taking the two's complement of the 32-bit constant and then adding this complemented value (rather than subtracting the uncomplemented value). Other transformations are equally possible and legal. The end result is that these three variations on the indexed addressing mode are indeed equivalent.
2.2.2.5 Scaled Indexed Addressing Modes
The scaled indexed addressing modes are similar to the indexed addressing modes with two differences: (1) the scaled indexed addressing modes allow you to combine two registers plus a displacement, and (2) the scaled indexed addressing modes let you multiply the index register by a (scaling) factor of one, two, four, or eight. The allowable forms for these addressing modes are
	VarName[ IndexReg32*scale ]

	VarName[ IndexReg32*scale + displacement ]

	VarName[ IndexReg32*scale - displacement ]
[ BaseReg32 + IndexReg32*scale ] [ BaseReg32 + IndexReg32*scale + displacement ] [ BaseReg32 + IndexReg32*scale - displacement ]VarName[ BaseReg32 + IndexReg32*scale ] VarName[ BaseReg32 + IndexReg32*scale + displacement ] VarName[ BaseReg32 + IndexReg32*scale - displacement ]In these examples, BaseReg32 represents any general purpose 32-bit register, IndexReg32 represents any general purpose 32-bit register except ESP, and scale must be one of the constants: 1, 2, 4, or 8.
The primary difference between the scaled indexed addressing mode and the indexed addressing mode is the inclusion of the IndexReg32*scale component. The effective address computation is extended by adding in the value of this new register after it has been multiplied by the specified scaling factor (see Figure 2.6 for an example involving EBX as the base register and ESI as the index register).
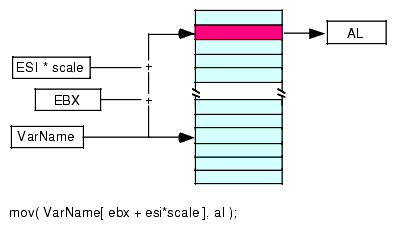
Figure 2.6 The Scaled Indexed Addressing Mode
In Figure 2.6, suppose that EBX contains $100, ESI contains $20, and VarName is at base address $2000 in memory, then the following instruction:
mov( VarName[ ebx + esi*4 + 4 ], al );will move the byte at address $2184 ($1000 + $100 + $20*4 + 4) into the AL register.
The scaled indexed addressing mode is typically used to access elements of arrays whose elements are two, four, or eight bytes each. This addressing mode is also useful for access elements of an array when you have a pointer to the beginning of the array.
Warning: although this addressing mode contains to variable components (the base and index registers), don't get the impression that you use this addressing mode to access elements of a two-dimensional array by loading the two array indices into the two registers. Two-dimensional array access is quite a bit more complicated than this. A later chapter in this text will consider multi-dimensional array access and discuss how to do this.
2.2.2.6 Addressing Mode Wrap-up
Well, believe it or not, you've just learned several hundred addressing modes! That wasn't hard now, was it? If you're wondering where all these modes came from, just consider the fact that the register indirect addressing mode isn't a single addressing mode, but eight different addressing modes (involving the eight different registers). Combinations of registers, constant sizes, and other factors multiply the number of possible addressing modes on the system. In fact, you only need to memorize less than two dozen forms and you've got it made. In practice, you'll use less than half the available addressing modes in any given program (and many addressing modes you may never use at all). So learning all these addressing modes is actually much easier than it sounds.
2.3 Run-Time Memory Organization
An operating system like Linux or Windows tends to put different types of data into different sections (or segments) of main memory. Although it is possible to reconfigure memory to your choice by running the Linker and specify various parameters, by default Windows loads an HLA program into memory using the following basic organization (Linux is similar, though it rearranges some of the sections):
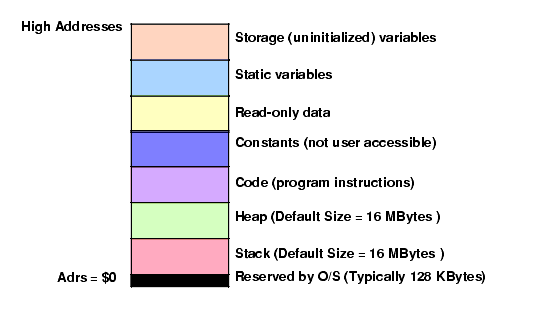
Figure 2.7 Win32 Typical Run-Time Memory Organization
The lowest memory addresses are reserved by the operating system. Generally, your application is not allowed to access data (or execute instructions) at the lowest addresses in memory. One reason the O/S reserves this space is to help trap NULL pointer references. If you attempt to access memory location zero, the operating system will generate a "general protection fault" meaning you've accessed a memory location that doesn't contain valid data. Since programmers often initialize pointers to NULL (zero) to indicate that the pointer is not pointing anywhere, an access of location zero typically means that the programmer has made a mistake and has not properly initialized a pointer to a legal (non-NULL) value. Also note that if you attempt to use one of the 80x86 sixteen-bit addressing modes (HLA doesn't allow this, but were you to encode the instruction yourself and execute it...) the address will always be in the range 0..$1FFFE4. This will also access a location in the reserved area, generating a fault.
The remaining six areas in the memory map hold different types of data associated with your program. These sections of memory include the stack section, the heap section, the code section, the READONLY section, the STATIC section, and the STORAGE section. Each of these memory sections correspond to some type of data you can create in your HLA programs. The following sections discuss each of these sections in detail.
2.3.1 The Code Section
The code section contains the machine instructions that appear in an HLA program. HLA translates each machine instruction you write into a sequence of one or more byte values. The CPU interprets these byte values as machine instructions during program execution.
By default, when HLA links your program it tells the system that your program can execute instructions out of the code segment and you can read data from the code segment. Note, specifically, that you cannot write data to the code segment. The operating system will generate a general protection fault if you attempt to store any data into the code segment.
Remember, machine instructions are nothing more than data bytes. In theory, you could write a program that stores data values into memory and then transfers control to the data it just wrote, thereby producing a program that writes itself as it executes. This possibility produces romantic visions of Artificially Intelligent programs that modify themselves to produce some desired result. In real life, the effect is somewhat less glamorous.
Prior to the popularity of protected mode operating systems, like Windows and Linux, a program could overwrite the machine instructions during execution. Most of the time this was caused by defects in a program, not by some super-smart artificial intelligence program. A program would begin writing data to some array and fail to stop once it reached the end of the array, eventually overwriting the executing instructions that make up the program. Far from improving the quality of the code, such a defect usually causes the program to fail spectacularly.
Of course, if a feature is available, someone is bound to take advantage of it. Some programmers have discovered that in some special cases, using self-modifying code, that is, a program that modifies its machine instructions during execution, can produce slightly faster or slightly smaller programs. Unfortunately, self-modifying code is very difficult to test and debug. Given the speed of modern processors combined with their instruction set and wide variety of addressing modes, there is almost no reason to use self-modifying code in a modern program. Indeed, protected mode operating systems like Linux and Windows make it difficult for you to write self modifying code.
HLA automatically stores the data associated with your machine code into the code section. In addition to machine instructions, you can also store data into the code section by using the following pseudo-opcodes:
The syntax for each of these pseudo-opcodes5 is exemplified by the following BYTE statement:
byte comma_separated_list_of_byte_constants ;boolean true; char `A'; byte 0,1,2; byte "Hello", 0 word 0,2; int8 -5; uns32 356789, 0;If more than one value appears in the list of values after the pseudo-opcode, HLA emits each successive value to the code stream. So the first byte statement above emits three bytes to the code stream, the values zero, one, and two. If a string appears within a byte statement, HLA emits one byte of data for each character in the string. Therefore, the second byte statement above emits six bytes: the characters `H', `e', `l', `l', and `o', followed by a zero byte.
Keep in mind that the CPU will attempt to treat data you emit to the code stream as machine instructions unless you take special care not to allow the execution of the data. For example, if you write something like the following:
		mov( 0, ax );

		byte 0,1,2,3;

		add( bx, cx );
Your program will attempt to execute the 0, 1, 2, and 3 byte values as a machine instruction after executing the MOV. Unless you know the machine code for a particular instruction sequence, sticking such data values into the middle of your code will almost always produce unexpected results. More often than not, this will crash your program. Therefore, you should never insert arbitrary data bytes into the middle of an instruction stream unless you know exactly what executing those data values will do in your program6.
2.3.2 The Static Sections
In addition to declaring static variables, you can also embed lists of data into the STATIC memory segment. You use the same technique to embed data into your STATIC section that you use to embed data into the code section: you use the byte, word, dword, uns32, etc., pseudo-opcodes. Consider the following example:
static

	b:	byte := 0;

		byte 1,2,3;


	u:	uns32 := 1;

		uns32 5,2,10;


	c:	char;

		char `a', `b', `c', `d', `e', `f';


	bn: boolean;

		boolean true;
Data that HLA writes to the STATIC memory segment using these pseudo-opcodes is written to the segment after the preceding variables. For example, the byte values one, two, and three are emitted to the STATIC section after b's zero byte in the example above. Since there aren't any labels associated with these values, you do not have direct access to these values in your program. The section on address expressions, later in this chapter, will discuss how to access these extra values.
In the examples above, note that the c and bn variables do not have an (explicit) initial value. However, HLA always initializes variables in the STATIC section to all zero bits, so HLA assigns the NULL character (ASCII code zero) to c as its initial value. Likewise, HLA assigns false as the initial value for bn. In particular, you should note that your variable declarations in the STATIC section always consume memory, even if you haven't assigned them an initial value. Any data you declare in a pseudo-opcode like BYTE will always follow the actual data associated with the variable declaration.
2.3.3 The Read-Only Data Section
The READONLY data section holds constants, tables, and other data that your program must not change during program execution. You can place read only objects in your program by declaring them in the READONLY declaration section. The READONLY data declaration section is very similar to the STATIC section with three primary differences:
- The READONLY section begins with the reserved word READONLY rather than STATIC,
- All declarations in the READONLY section must have an initializer, and
- You are not allowed to store data into a READONLY object while the program is running.
readonly

	pi:			real32 := 3.14159;

	e:			real32 := 2.71;

	MaxU16:			uns16  := 65_535;

	MaxI16:			int16  := 32_767;
All READONLY object declarations must have an initializer because you cannot initialize the value under program control (since you are not allowed to write data into a READONLY object). The operating system will generate an exception and abort your program if you attempt to write a value to a READONLY object. For all intents and purposes, READONLY objects can be thought of as constants. However, these constants consume memory and other than the fact that you cannot write data to READONLY objects, they behave like, and can be used like, STATIC variables. Since they behave like STATIC objects, you cannot use a READONLY object everywhere a constant is allowed; in particular, READONLY objects are memory objects, so you cannot supply a READONLY object and some other memory object as the operand to an instruction7.
The READONLY reserved word allows an alignment parameter, just like the STATIC keyword (See "HLA Support for Data Alignment" on page 130.). You may also place the ALIGN directive in the READONLY section in order to align individual objects on a specific boundary. The following example demonstrates both of these features in the READONLY section:
readonly( 8 )

	pi:		real64 := 3.14159265359;

	aChar:		char   := `a';

	align(4);

	d:		dword := 4;
Note that, also like the STATIC section, you may embed data values in the READONLY section using the BYTE, WORD, DWORD, etc., data declarations, e.g.,
readonly

	roArray: byte := 0;

				byte 1, 2, 3, 4, 5;

	qwVal: dword := 1;

			dword 0;
2.3.4 The Storage Section
The READONLY section requires that you initialize all objects you declare. The STATIC section lets you optionally initialize objects (or leave them uninitialized, in which case they have the default initial value of zero). The STORAGE section completes the initialization coverage: you use it to declare variables that are always uninitialized when the program begins running. The STORAGE section begins with the "storage" reserved word and then contains variable declarations that are identical to those appearing in the STATIC section except that you are not allowed to initialize the object. Here is an example:
storage

	UninitUns32:					uns32;

	i:					int32;

	character:					char;

	b:					byte;
Linux and Windows will initialize all storage objects to zero when they load your program into memory. However, it's probably not a good idea to depend upon this implicit iniitialization. If you need an object initialized with zero, declare it in a STATIC section and explicitly set it to zero.
Variables you declare in the STORAGE section may consume less disk space in the executable file for the program. This is because HLA writes out initial values for READONLY and STATIC objects to the executable file, but uses a compact representation for uninitialized variables you declare in the STORAGE section.
Like the STATIC and READONLY sections, you can supply an alignment parameter after the STORAGE keyword and the ALIGN directive may appear within the STORAGE section (See "HLA Support for Data Alignment" on page 130.). Of course, aligning your data can produce faster access to that data at the expense of a slightly larger STORAGE section. The following example demonstrates the use of these two features in the STORAGE section:
storage( 4 )

	d:		dword;

	b:		byte;

	align(2);

	w:		word;
Since the STORAGE section does not allow initialized values, you cannot put unlabelled values in the STORAGE section using the BYTE, WORD, DWORD, etc., data declarations.
2.3.5 The @NOSTORAGE Attribute
The @NOSTORAGE attribute lets you declare variables in the static data declaration sections (i.e., STATIC, READONLY, and STORAGE) without actually allocating memory for the variable. The @NOSTORAGE option tells HLA to assign the current address in a data declaration section to a variable but not allocate any storage for the object. Therefore, that variable will share the same memory address as the next object appearing in the variable declaration section. Here is the syntax for the @NOSTORAGE option:
variableName: varType; @nostorage;Note that you follow the type name with "@nostorage;" rather than some initial value or just a semicolon. The following code sequence provides an example of using the @NOSTORAGE option in the READONLY section:
readonly

	abcd: dword; nostorage;

			byte `a', `b', `c', `d';
In this example, abcd is a double word whose L.O. byte contains 97 (`a'), byte #1 contains 98 (`b'), byte #2 contains 99 (`c'), and the H.O. byte contains 100 (`d'). HLA does not reserve storage for the abcd variable, so HLA associates the following four bytes in memory (allocated by the BYTE directive) with abcd.
Note that the @NOSTORAGE attribute is only legal in the STATIC, STORAGE, and READONLY sections. HLA does not allow its use in the VAR section.
2.3.6 The Var Section
HLA provides another variable declaration section, the VAR section, that you can use to create automatic variables. Your program will allocate storage for automatic variables whenever a program unit (i.e., main program or procedure) begins execution, and it will deallocate storage for automatic variables when that program unit returns to its caller. Of course, any automatic variables you declare in your main program have the same lifetime8 as all the STATIC, READONLY, and STORAGE objects, so the automatic allocation feature of the VAR section is wasted on the main program. In general, you should only use automatic objects in procedures (see the chapter on procedures for details). HLA allows them in your main program's declaration section as a generalization.
Since variables you declare in the VAR section are created at run-time, HLA does not allow initializers on variables you declare in this section. So the syntax for the VAR section is nearly identical to that for the STORAGE section; the only real difference in the syntax between the two is the use of the VAR reserved word rather than the STORAGE reserved word. The following example illustrates this:
var

	vInt:		int32;

	vChar:		char;
HLA allocates variables you declare in the VAR section in the stack segment. HLA does not allocate VAR objects at fixed locations within the stack segment; instead, it allocates these variables in an activation record associated with the current program unit. The chapter on intermediate procedures will discuss activation records in greater detail, for now it is important only to realize that HLA programs use the EBP register as a pointer to the current activation record. Therefore, anytime you access a var object, HLA automatically replaces the variable name with "[EBP+displacement]". Displacement is the offset of the object in the activation record. This means that you cannot use the full scaled indexed addressing mode (a base register plus a scaled index register) with VAR objects because VAR objects already use the EBP register as their base register. Although you will not directly use the two register addressing modes often, the fact that the VAR section has this limitation is a good reason to avoid using the VAR section in your main program.
The VAR section supports the align parameter and the ALIGN directive, like the other declaration sections, however, these align directives only guarantee that the alignment within the activation record is on the boundary you specify. If the activation record is not aligned on a reasonable boundary (unlikely, but possible) then the actual variable alignment won't be correct.
2.3.7 Organization of Declaration Sections Within Your Programs
The STATIC, READONLY, STORAGE, and VAR sections may appear zero or more times between the PROGRAM header and the associated BEGIN for the main program. Between these two points in your program, the declaration sections may appear in any order as the following example demonstrates:
program demoDeclarations;


static

	i_static:			int32;


var

	i_auto:			int32;


storage

	i_uninit:			int32;


readonly

	i_readonly: int32 := 5;


static

	j:			uns32;


var

	k:char;


readonly

	i2:uns8 := 9;


storage

	c:char;


storage

	d:dword;


begin demoDeclarations;


	<< code goes here >>


end demoDeclarations;
In addition to demonstrating that the sections may appear in an arbitrary order, this section also demonstrates that a given declaration section may appear more than once in your program. When multiple declaration sections of the same type (e.g., the three STORAGE sections above) appear in a declaration section of your program, HLA combines them into a single section9.
2.4 Address Expressions
In the section on addressing modes (see "The 80x86 Addressing Modes" on page 141) this chapter points out that addressing modes take a couple generic forms, including:
VarName[ Reg32 ]

VarName[ Reg32 + offset ]

VarName[ RegNotESP32*Scale ]

VarName[ Reg32 + RegNotESP32*Scale ]

VarName[ RegNotESP32*Scale + offset ]

and

VarName[ Reg32 + RegNotESP32*Scale + offset ]
Another legal form, which isn't actually a new addressing mode but simply an extension of the displacement-only addressing mode is
VarName[ offset ]This latter example computes its effective address by adding the (constant) offset within the brackets to the specified variable address. For example, the instruction "MOV(Address[3], AL);" loads the AL register with the byte in memory that is three bytes beyond the Address object.

Figure 2.8 Using an Address Expression to Access Data Beyond a Variable
It is extremely important to remember that the offset value in these examples must be a constant. If Index is an int32 variable, then "Variable[Index]" is not a legal specification. If you wish to specify an index that varies an run-time, then you must use one of the indexed or scaled indexed addressing modes; that is, any index that changes at run-time must be held in a general purpose 32-bit register.
Another important thing to remember is that the offset in "Address[offset]" is a byte offset. Despite the fact that this syntax is reminiscent of array indexing in a high level language like C/C++ or Pascal, this does not properly index into an array of objects unless Address is an array of bytes.
This text will consider an address expression to be any legal 80x86 addressing mode that includes a displacement (i.e., variable name) or an offset. In addition to the above forms, the following are also address expressions:
[ Reg32 + offset ]

[ Reg32 + RegNotESP32*Scale + offset ]
This text will not consider the following to be address expressions since they do not involve a displacement or offset component:
[ Reg32 ]

[ Reg32 + RegNotESP32*Scale ]
Address expressions are special because those instructions containing an address expression always encode a displacement constant as part of the machine instruction. That is, the machine instruction contains some number of bits (usually eight or thirty-two) that hold a numeric constant. That constant is the sum of the displacement (i.e., the address or offset of the variable) plus the offset supplied in the addressing mode. Note that HLA automatically adds these two values together for you (or subtracts the offset if you use the "-" rather than "+" operator in the addressing mode).
Until this point, the offset in all the addressing mode examples has always been a single numeric constant. However, HLA also allows a constant expression anywhere an offset is legal. A constant expression consists of one or more constant terms manipulated by operators such as addition, subtraction, multiplication, division, modulo, and a wide variety of other operators. Most address expressions, however, will only involve addition, subtraction, multiplication, and sometimes, division. Consider the following example:
mov( X[ 2*4+1 ], al );This instruction will move the byte at address X+9 into the AL register.
The value of an address expression is always computed at compile-time, never while the program is running. When HLA encounters the instruction above, it calculates 2*4+1 on the spot and adds this result to the base address of X in memory. HLA encodes this single sum (base address of X plus nine) as part of the instruction; HLA does not emit extra instructions to compute this sum for you at run-time (which is good, doing so would be less efficient). Since HLA computes the value of address expressions at compile-time, all components of the expression must be constants since HLA cannot know what the value of a variable will be at run-time while it is compiling the program.
Address expressions are very useful for accessing additional bytes in memory beyond a variable, particularly when you've used the byte, word, dword, etc., statements in a STATIC, or READONLY section to tack on additional bytes after a data declaration. For example, consider the following program:
program adrsExpressions;

#include( "stdlib.hhf" );

static

    i:  int8; @nostorage;

        byte 0, 1, 2, 3;


begin adrsExpressions;


    stdout.put

    (

        "i[0]=", i[0], nl,

        "i[1]=", i[1], nl,

        "i[2]=", i[2], nl,

        "i[3]=", i[3], nl

    );


end adrsExpressions;


Program 3.1	 Demonstration of Address Expressions
Throughout this chapter and those that follow you will see several additional uses of address expressions.
2.5 Type Coercion
Although HLA is fairly loose when it comes to type checking, HLA does ensure that you specify appropriate operand sizes to an instruction. For example, consider the following (incorrect) program:
program hasErrors;

static

	i8:		int8;

	i16:		int16;

	i32:		int32;

begin hasErrors;


	mov( i8, eax );

	mov( i16, al );

	mov( i32, ax );


end hasErrors;
HLA will generate errors for the three MOV instructions appearing in this program. This is because the operand sizes do not agree. The first instruction attempts to move a byte into EAX, the second instruction attempts to move a word into AL and the third instruction attempts to move a dword into AX. The MOV instruction, of course, requires that its two operands both be the same size.
While this is a good feature in HLA10, there are times when it gets in the way of the task at hand. For example, consider the following data declaration:
static

	byte_values: byte; @nostorage;

					byte		0, 1;


	...


		mov( byte_values, ax );
In this example let's assume that the programmer really wants to load the word starting at address byte_values in memory into the AX register because they want to load AL with zero and AH with one using a single instruction. HLA will refuse, claiming there is a type mismatch error (since byte_values is a byte object and AX is a word object). The programmer could break this into two instructions, one to load AL with the byte at address byte_values and the other to load AH with the byte at address byte_values[1]. Unfortunately, this decomposition makes the program slightly less efficient (which was probably the reason for using the single MOV instruction in the first place). Somehow, it would be nice if we could tell HLA that we know what we're doing and we want to treat the byte_values variable as a word object. HLA's type coercion facilities provide this capability.
Type coercion11 is the process of telling HLA that you want to treat an object as an explicitly specified type, regardless of its actual type. To coerce the type of a variable, you use the following syntax:
(type newTypeName addressingMode)The newTypeName component is the new type you wish HLA to apply to the memory location specified by addressingMode. You may use this coercion operator anywhere a memory address is legal. To correct the previous example, so HLA doesn't complain about type mismatches, you would use the following statement:
mov( (type word byte_values), ax );This instruction tells HLA to load the AX register with the word starting at address byte_values in memory. Assuming byte_values still contains its initial values, this instruction will load zero into AL and one into AH.
Type coercion is necessary when you specify an anonymous variable as the operand to an instruction that modifies memory directly (e.g., NEG, SHL, NOT, etc.). Consider the following statement:
not( [ebx] );HLA will generate an error on this instruction because it cannot determine the size of the memory operand. That is, the instruction does not supply sufficient information to determine whether the program should invert the bits in the byte pointed at by EBX, the word pointed at by EBX, or the double word pointed at by EBX. You must use type coercion to explicitly tell HLA the size of the memory operand when using anonymous variables with these types of instructions:
							not( (type byte [ebx]) );

							not( (type word [ebx]) );

							not( (type dword [ebx]) );
Warning: do not use the type coercion operator unless you know exactly what you are doing and the effect that it has on your program. Beginning assembly language programmers often use type coercion as a tool to quiet the compiler when it complains about type mismatches without solving the underlying problem. For example, consider the following statement (where byteVar is an actual eight-bit variable):
mov( eax, (type dword byteVar) );Without the type coercion operator, HLA probably complains about this instruction because it attempts to store a 32-bit register into an eight-bit memory location (assuming byteVar is a byte variable). A beginning programmer, wanting their program to compile, may take a short cut and use the type coercion operator as shown in this instruction; this certainly quiets the compiler - it will no longer complain about a type mismatch. So the beginning programmer is happy. But the program is still incorrect, the only difference is that HLA no longer warns you about your error. The type coercion operator does not fix the problem of attempting to store a 32-bit value into an eight-bit memory location - it simply allows the instruction to store a 32-bit value starting at the address specified by the eight-bit variable. The program still stores away four bytes, overwriting the three bytes following byteVar in memory. This often produces unexpected results including the phantom modification of variables in your program12. Another, rarer, possibility is for the program to abort with a general protection fault. This can occur if the three bytes following byteVar are not allocated in real memory or if those bytes just happen to fall in a read-only segment in memory. The important thing to remember about the type coercion operator is this: "If you can't exactly state the affect this operator has, don't use it."
Also keep in mind that the type coercion operator does not perform any translation of the data in memory. It simply tells the compiler to treat the bits in memory as a different type. It will not automatically sign extend an eight-bit value to 32 bits nor will it convert an integer to a floating point value. It simply tells the compiler to treat the bit pattern that exists in memory as a different type.
2.6 Register Type Coercion
You can also cast a register as a specific type using the type coercion operator. By default, the eight-bit registers are of type byte, the 16-bit registers are of type word, and the 32-bit registers are of type dword. With type coercion, you can cast a register as a different type as long as the size of the new type agrees with the size of the register. This is an important restriction that does not apply when applying type coercion to a memory variable.
Most of the time you do not need to coerce a register to a different type. After all, as byte, word, and dword objects, they are already compatible with all one, two, and four byte objects. However, there are a few instances where register type coercion is handy, if not downright necessary. Two examples include boolean expressions in HLA high level language statements (e.g., IF and WHILE) and register I/O in the stdout.put and stdin.get (and related) statements.
In boolean expressions, byte, word, and dword objects are always treated as unsigned values. Therefore, without type coercion register objects are always treated as unsigned values so the boolean expression in the following IF statement is always false (since there is no unsigned value less than zero):
if( eax < 0 ) then


	stdout.put( "EAX is negative!", nl );


endif;
You can overcome this limitation by casting EAX as an int32 value:
if( (type int32 eax) < 0 ) then


	stdout.put( "EAX is negative!", nl );


endif;
In a similar vein, the HLA Standard Library stdout.put routine always outputs byte, word, and dword values as hexadecimal numbers. Therefore, if you attempt to print a register, the stdout.put routine will print it as a hex value. If you would like to print the value as some other type, you can use register type coercion to achieve this:
stdout.put( "AL printed as a char = `", (type char al), "`", nl );The same is true for the stdin.get routine. It will always read a hexadecimal value for a register unless you coerce its type to something other than byte, word, or dword.
2.7 The Stack Segment and the Push and Pop Instructions
This chapter mentions that all variables you declare in the VAR section wind up in the stack memory segment (see "The Var Section" on page 153). However, VAR objects are not the only things that wind up in the stack segment in memory; your programs manipulate data in the stack segment in many different ways. This section introduces a set of instructions, the PUSH and POP instructions, that also manipulate data in the stack segment.
The stack segment in memory is where the 80x86 maintains the stack. The stack is a dynamic data structure that grows and shrinks according to certain memory needs of the program. The stack also stores important information about program including local variables, subroutine information, and temporary data.
The 80x86 controls its stack via the ESP (stack pointer) register. When your program begins execution, the operating system initializes ESP with the address of the last memory location in the stack memory segment. Data is written to the stack segment by "pushing" data onto the stack and "popping" or "pulling" data off of the stack. Whenever you push data onto the stack, the 80x86 decrements the stack pointer by the size of the data you are pushing and then it copies the data to memory where ESP is then pointing. As a concrete example, consider the 80x86 PUSH instruction:
push( reg16 );

push( reg32 );

push( memory16 );

push( memory32 );

pushw( constant );

pushd( constant );
These six forms allow you to push word or dword registers, memory locations, and constants. You should specifically note that you cannot push byte values onto the stack.
2.7.1 The Basic PUSH Instruction
The PUSH instruction does the following:
		ESP := ESP - Size_of_Register_or_Memory_Operand (2 or 4)

		[ESP] := Operand's_Value
The PUSHW and PUSHD operand sizes are always two or four bytes, respectively.
Assuming that ESP contains $00FF_FFE8, then the instruction "PUSH( EAX );" will set ESP to $00FF_FFE4 and store the current value of EAX into memory location $00FF_FFE4 as shown in Figure 2.9 and Figure 2.10:

Figure 2.9 Stack Segment Before "PUSH( EAX );" Operation
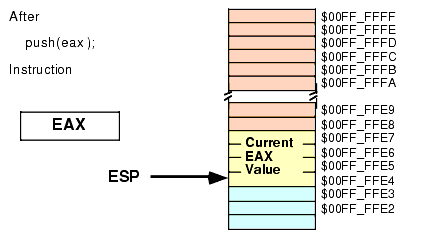
Figure 2.10 Stack Segment After "PUSH( EAX );" Operation
Note that the "PUSH( EAX );" instruction does not affect the value in the EAX register.
Although the 80x86 supports 16-bit push operations, these are intended primarily for use in 16-bit environments such as DOS. For maximum performance, the stack pointer should always be an even multiple of four; indeed, your program may malfunction under Windows or Linux if ESP contains a value that is not a multiple of four and you make an HLA Standard Library or an operating system API call. The only practical reason for pushing less than four bytes at a time on the stack is because you're building up a double word via two successive word pushes.
2.7.2 The Basic POP Instruction
To retrieve data you've pushed onto the stack, you use the POP instruction. The basic POP instruction allows the following different forms:
								pop( reg16 );

								pop( reg32 );

								pop( memory16 );

								pop( memory32 );
Like the PUSH instruction, the POP instruction only supports 16-bit and 32-bit operands; you cannot pop an eight-bit value from the stack. Also like the PUSH instruction, you should avoid popping 16-bit values (unless you do two 16-bit pops in a row) because 16-bit pops may leave the ESP register containing a value that is not an even multiple of four. One major difference between PUSH and POP is that you cannot POP a constant value (which makes sense, because the operand for PUSH is a source operand while the operand for POP is a destination operand).
Formally, here's what the POP instruction does:
		Operand := [ESP]

		ESP := ESP + Size_of_Operand (2 or 4)
As you can see, the POP operation is the converse of the PUSH operation. Note that the POP instruction copies the data from memory location [ESP] before adjusting the value in ESP. See Figure 2.11 and Figure 2.12 for details on this operation:
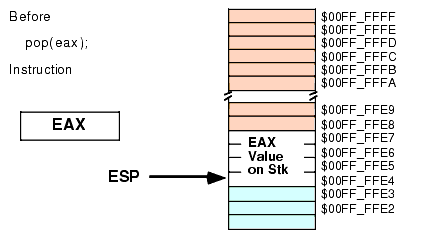
Figure 2.11 Memory Before a "POP( EAX );" Operation
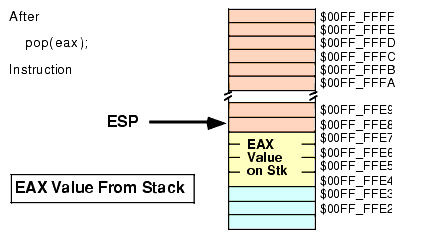
Figure 2.12 Memory After the "POP( EAX );" Instruction
Note that the value popped from the stack is still present in memory. Popping a value does not erase the value in memory, it just adjusts the stack pointer so that it points at the next value above the popped value. However, you should never attempt to access a value you've popped off the stack. The next time something is pushed onto the stack, the popped value will be obliterated. Since your code isn't the only thing that uses the stack (i.e., the operating system uses the stack as do other subroutines), you cannot rely on data remaining in stack memory once you've popped it off the stack.
2.7.3 Preserving Registers With the PUSH and POP Instructions
Perhaps the most common use of the PUSH and POP instructions is to save register values during intermediate calculations. A problem with the 80x86 architecture is that it provides very few general purpose registers. Since registers are the best place to hold temporary values, and registers are also needed for the various addressing modes, it is very easy to run out of registers when writing code that performs complex calculations. The PUSH and POP instructions can come to your rescue when this happens.
Consider the following program outline:
	<< Some sequence of instructions that use the EAX register >>


	<< Some sequence of instructions that need to use EAX, for a

		different purpose than the above instructions >>


	<< Some sequence of instructions that need the original value in EAX >>
The PUSH and POP instructions are perfect for this situation. By inserting a PUSH instruction before the middle sequence and a POP instruction after the middle sequence above, you can preserve the value in EAX across those calculations:
	<< Some sequence of instructions that use the EAX register >>

	push( eax );

	<< Some sequence of instructions that need to use EAX, for a

		different purpose than the above instructions >>

	pop( eax );

	<< Some sequence of instructions that need the original value in EAX >>
The PUSH instruction above copies the data computed in the first sequence of instructions onto the stack. Now the middle sequence of instructions can use EAX for any purpose it chooses. After the middle sequence of instructions finishes, the POP instruction restores the value in EAX so the last sequence of instructions can use the original value in EAX.
2.7.4 The Stack is a LIFO Data Structure
You can push more than one value onto the stack without first popping previous values off the stack. However, the stack is a last-in, first-out (LIFO) data structure, so you must be careful how you push and pop multiple values. For example, suppose you want to preserve EAX and EBX across some block of instructions, the following code demonstrates the obvious way to handle this:
		push( eax );

		push( ebx );

		<< Code that uses EAX and EBX goes here >>

		pop( eax );

		pop( ebx );
Unfortunately, this code will not work properly! Figures 2.13, 2.14, 2.15, and 2.16 show the problem. Since this code pushes EAX first and EBX second, the stack pointer is left pointing at EBX's value on the stack. When the POP( EAX ) instruction comes along, it removes the value that was originally in EBX from the stack and places it in EAX! Likewise, the POP( EBX ) instruction pops the value that was originally in EAX into the EBX register. The end result is that this code has managed to swap the values in the registers by popping them in the same order that it pushed them.

Figure 2.13 Stack After Pushing EAX
Figure 2.14 Stack After Pushing EBX
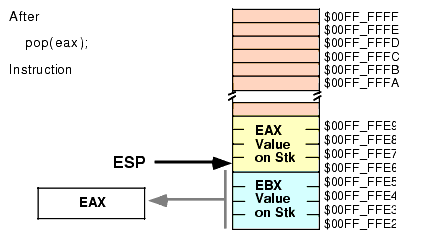
Figure 2.15 Stack After Popping EAX
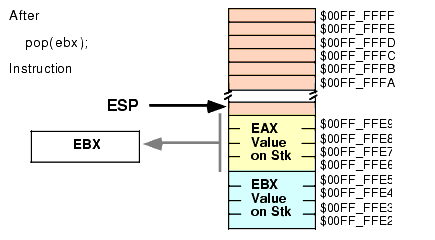
Figure 2.16 Stack After Popping EBX
To rectify this problem, you must note that the stack is a last-in, first-out data structure, so the first thing you must pop is the last thing you've pushed onto the stack. Therefore, you must always observe the following maxim:
The correction to the previous code is
		push( eax );

		push( ebx );

		<< Code that uses EAX and EBX goes here >>

		pop( ebx );

		pop( eax );
Another important maxim to remember is
This generally means that the number of pushes and pops must exactly agree. If you have too few pops, you will leave data on the stack which may confuse the running program13; If you have too many pops, you will accidentally remove previously pushed data, often with disastrous results.
A corollary to the maxim above is "Be careful when pushing and popping data within a loop." Often it is quite easy to put the pushes in a loop and leave the pops outside the loop (or vice versa), creating an inconsistent stack. Remember, it is the execution of the PUSH and POP instructions that matters, not the number of PUSH and POP instructions that appear in your program. At run-time, the number (and order) of the PUSH instructions the program executes must match the number (and reverse order) of the POP instructions.
2.7.5 Other PUSH and POP Instructions
The 80x86 provides several additional PUSH and POP instructions in addition to the basic instructions described in the previous sections. These instructions include the following:
The PUSHA instruction pushes all the general-purpose 16-bit registers onto the stack. This instruction is primarily intended for older 16-bit operating systems like DOS. In general, you will have very little need for this instruction. The PUSHA instruction pushes the registers onto the stack in the following order:
ax

cx

dx

bx

sp

bp

si

di
The PUSHAD instruction pushes all the 32-bit (dword) registers onto the stack. It pushes the registers onto the stack in the following order:
eax

ecx

edx

ebx

esp

ebp

esi

edi
Since the SP/ESP register is inherently modified by the PUSHA and PUSHAD instructions, you may wonder why Intel bothered to push it at all. It was probably easier in the hardware to go ahead and push SP/ESP rather than make a special case out of it. In any case, these instructions do push SP or ESP so don't worry about it too much - there is nothing you can do about it.
The POPA and POPAD instructions provide the corresponding "pop all" operation to the PUSHA and PUSHAD instructions. This will pop the registers pushed by PUSHA or PUSHAD in the appropriate order (that is, POPA and POPAD will properly restore the register values by popping them in the reverse order that PUSHA or PUSHAD pushed them).
Although the PUSHA/POPA and PUSHAD/POPAD sequences are short and convenient, they are actually slower than the corresponding sequence of PUSH/POP instructions, this is especially true when you consider that you rarely need to push a majority, much less all the registers14. So if you're looking for maximum speed, you should carefully consider whether to use the PUSHA(D)/POPA(D) instructions. This text generally opts for convenience and readability; so it will use the PUSHAD and POPAD instructions without worrying about lost efficiency.
The PUSHF, PUSHFD, POPF, and POPFD instructions push and pop the (E)FLAGs register. These instructions allow you to preserve condition code and other flag settings across the execution of some sequence of instructions. Unfortunately, unless you go to a lot of trouble, it is difficult to preserve individual flags. When using the PUSHF(D) and POPF(D) instructions it's an all or nothing proposition - you preserve all the flags when you push them, you restore all the flags when you pop them.
Like the PUSHA and POPA instructions, you should really use the PUSHFD and POPFD instructions to push the full 32-bit version of the EFLAGs register. Although the extra 16-bits you push and pop are essentially ignored when writing applications, you still want to keep the stack aligned by pushing and popping only double words.
2.7.6 Removing Data From the Stack Without Popping It
Once in a while you may discover that you've pushed data onto the stack that you no longer need. Although you could pop the data into an unused register or memory location, there is an easier way to remove unwanted data from the stack - simply adjust the value in the ESP register to skip over the unwanted data on the stack.
Consider the following dilemma:
		push( eax );

		push( ebx );


		<< Some code that winds up computing some values we want to keep

			into EAX and EBX >>


		if( Calculation_was_performed ) then


			// Whoops, we don't want to pop EAX and EBX!

			// What to do here?


		else


			// No calculation, so restore EAX, EBX.


			pop( ebx );

			pop( eax );


		endif;
Within the THEN section of the IF statement, this code wants to remove the old values of EAX and EBX without otherwise affecting any registers or memory locations. How to do this?
Since the ESP register simply contains the memory address of the item on the top of the stack, we can remove the item from the top of stack by adding the size of that item to the ESP register. In the example above, we want to remove two double word items from the top of stack, so we can easily accomplish this by adding eight to the stack pointer:
		push( eax );

		push( ebx );


		<< Some code that winds up computing some values we want to keep

			into EAX and EBX >>


		if( Calculation_was_performed ) then


			add( 8, ESP );					// Remove unneeded EAX and EBX values from the stack.


		else


			// No calculation, so restore EAX, EBX.


			pop( ebx );

			pop( eax );


		endif;

Figure 2.17 Removing Data from the Stack, Before ADD( 8, ESP )
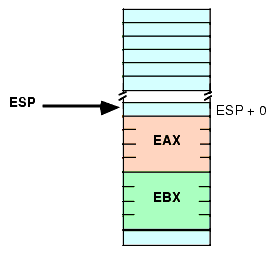
Figure 2.18 Removing Data from the Stack, After ADD( 8, ESP );
Effectively, this code pops the data off the stack without moving it anywhere. Also note that this code is faster than two dummy POP instructions because it can remove any number of bytes from the stack with a single ADD instruction.
Warning: remember to keep the stack aligned on a double word boundary. Therefore, you should always add a constant that is an even multiple of four to ESP when removing data from the stack.
2.7.7 Accessing Data You've Pushed on the Stack Without Popping It
Once in a while you will push data onto the stack and you will want to get a copy of that data's value, or perhaps you will want to change that data's value, without actually popping the data off the stack (that is, you wish to pop the data off the stack at a later time). The 80x86 "[reg32 + offset]" addressing mode provides the mechanism for this.
Consider the stack after the execution of the following two instructions (see Figure 2.19):
		push( eax );

		push( ebx );

Figure 2.19 Stack After Pushing EAX and EBX
If you wanted to access the original EBX value without removing it from the stack, you could cheat and pop the value and then immediately push it again. Suppose, however, that you wish to access EAX's old value; or some other value even farther up on the stack. Popping all the intermediate values and then pushing them back onto the stack is problematic at best, impossible at worst. However, as you will notice from Figure 2.19, each of the values pushed on the stack is at some offset from the ESP register in memory. Therefore, we can use the "[ESP + offset]" addressing mode to gain direct access to the value we are interested it. In the example above, you can reload EAX with its original value by using the single instruction:
mov( [esp+4], eax );This code copies the four bytes starting at memory address ESP+4 into the EAX register. This value just happens to be the value of EAX that was earlier pushed onto the stack. This same technique can be used to access other data values you've pushed onto the stack.
- Warning: Don't forget that the offsets of values from ESP into the stack change every time you push or pop data. Abusing this feature can create code that is hard to modify; if you use this feature throughout your code, it will make it difficult to push and pop other data items between the point you first push data onto the stack and the point you decide to access that data again using the "[ESP + offset]" memory addressing mode.
The previous section pointed out how to remove data from the stack by adding a constant to the ESP register. That code example could probably be written more safely as:
		push( eax );

		push( ebx );


		<< Some code that winds up computing some values we want to keep

			into EAX and EBX >>


		if( Calculation_was_performed  ) then


			// Overwrite saved values on stack with new EAX/EBX values.

			// (so the pops that follow won't change the values in EAX/EBX.)

			mov( eax, [esp+4] );

			mov( ebx, [esp] );


		endif;

		pop( ebx );

		pop( eax );
In this code sequence, the calculated result was stored over the top of the values saved on the stack. Later on, when the values are popped off the stack, the program loads these calculated values into EAX and EBX.
2.8 Dynamic Memory Allocation and the Heap Segment
Although static and automatic variables are all simple programs may need, more sophisticated programs need the ability to allocate and deallocate storage dynamically (at run-time) under program control. In the C language, you would use the malloc and free functions for this purpose. C++ provides the new and delete operators. Pascal uses new and dispose. Other languages provide comparable routines. These memory allocation routines share a couple of things in common: they let the programmer request how many bytes of storage to allocate, they return a pointer to the newly allocated storage, and they provide a facility for returning the storage to the system so the system can reuse it in a future allocation call. As you've probably guessed, HLA also provides a set of routines in the HLA Standard Library that handle memory allocation and deallocation.
The HLA Standard Library malloc and free routines handle the memory allocation and deallocation chores (respectively)15. The malloc routine uses the following calling sequence:
malloc( Number_of_Bytes_Requested );The single parameter is a dword value (an unsigned constant) specifying the number of bytes of storage you are requesting. This procedure allocate storages in the heap segment in memory. The HLA malloc function locates an unused block of memory of the specified size in the heap segment and marks the block as "in use" so that future calls to malloc will not reallocate this same storage. After marking the block as "in use" the malloc routine returns a pointer to the first byte of this storage in the EAX register.
For many objects, you will know the number of bytes that you need in order to represent that object in memory. For example, if you wish to allocate storage for an uns32 variable, you could use the following call to the malloc routine:
malloc( 4 );Although you can specify a literal constant as this example suggests, it's generally a poor idea to do so when allocating storage for a specific data type. Instead, use the HLA built-in compile-time function @size to compute the size of some data type. The @size function uses the following syntax:
@size( variable_or_type_name )The @size function returns an unsigned integer constant that specifies the size of its parameter in bytes. So you should rewrite the previous call to malloc as follows:
malloc( @size( uns32 ));This call will properly allocate a sufficient amount of storage for the specified object, regardless of its type. While it is unlikely that the number of bytes required by an uns32 object will ever change, this is not necessarily true for other data types; so you should always use @size rather than a literal constant in these calls.
Upon return from the malloc routine, the EAX register contains the address of the storage you have requested (see Figure 2.20):
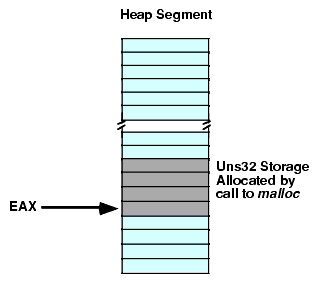
Figure 2.20 Call to Malloc Returns a Pointer in the EAX Register
To access the storage malloc allocates you must use a register indirect addressing mode. The following code sequence demonstrates how to assign the value 1234 to the uns32 variable malloc creates:
		malloc( @size( uns32 ));

		mov( 1234, (type uns32 [eax]));
Note the use of the type coercion operation. This is necessary in this example because anonymous variables don't have a type associated with them and the constant 1234 could be a word or dword value. The type coercion operator eliminates the ambiguity.
A call to the malloc routine is not guaranteed to succeed. If there isn't a single contiguous block of free memory in the heap segment that is large enough to satisfy the request, then the malloc routine will raise an ex.MemoryAllocationFailure exception. If you do not provide a TRY..EXCEPTION..ENDTRY handler to deal with this situation, a memory allocation failure will cause your program to abort execution. Since most programs do not allocate massive amounts of dynamic storage using malloc, this exception rarely occurs. However, you should never assume that the memory allocation will always occur without error.
When you are done using a value that malloc allocates on the heap, you can release the storage (that is, mark it as "no longer in use") by calling the free procedure. The free routine requires a single parameter that must be an address that was a previous return value of the malloc routine (that you have not already freed). The following code fragment demonstrates the nature of the malloc/free pairing:
		malloc( @size( uns32));


			<< use the storage pointed at by EAX >>

			<< Note: this code must not modify EAX >>


		free( eax );
This code demonstrates a very important point - in order to properly free the storage that malloc allocates, you must preserve the value that malloc returns. There are several ways to do this if you need to use EAX for some other purpose; you could save the pointer value on the stack using PUSH and POP instructions or you could save EAX's value in a variable until you need to free it.
Storage you release is available for reuse by future calls to the malloc routine. Like automatic variables you declare in the VAR section, the ability to allocate storage while you need it and then free the storage for other use when you are done with it improves the memory efficiency of your program. By deallocating storage once you are finished with it, your program can reuse that storage for other purposes allowing your program to operate with less memory than it would if you statically allocated storage for the individual objects.
The are several problems that can occur when you use pointers. You should be aware of a few common errors that beginning programmers make when using dynamic storage allocation routines like malloc and free:
- Mistake #1: Continuing to refer to storage after you free it. Once you return storage to the system via the call to free, you should no longer access that storage. Doing so may cause a protection fault or, worse yet, corrupt other data in your program without indicating an error.
- Mistake #2: Calling free twice to release a single block of storage. Doing so may accidentally free some other storage that you did not intend to release or, worse yet, it may corrupt the system memory management tables.
A later chapter will discuss some additional problems you will typically encounter when dealing with dynamically allocated storage.
The examples thus far in this section have all allocated storage for a single unsigned 32-bit object. Obviously you can allocate storage for any data type using a call to malloc by simply specifying the size of that object as malloc's parameter. It is also possible to allocate storage for a sequence of contiguous objects in memory when calling malloc. For example, the following code will allocate storage for a sequence of 8 characters:
malloc( @size( char ) * 8 );Note the use of the constant expression to compute the number of bytes required by an eight-character sequence. Since "@size(char)" always returns a constant value (one in this case), the compiler can compute the value of the expression "@size(char) * 8" without generating any extra machine instructions.
Calls to malloc always allocate multiple bytes of storage in contiguous memory locations. Hence the former call to malloc produces the sequence appearing in Figure 2.21:
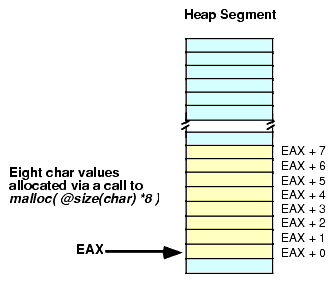
Figure 2.21 Allocating a Sequence of Eight Character Objects Using Malloc
To access these extra character values you use an offset from the base address (contained in EAX upon return from malloc). For example, "MOV( CH, [EAX + 2] );" stores the character found in CH into the third byte that malloc allocates. You can also use an addressing mode like "[EAX + EBX]" to step through each of the allocated objects under program control. For example, the following code will set all the characters in a block of 128 bytes to the NULL character (#0):
		malloc( 128 );

		for( mov( 0, ebx ); ebx < 128; add( 1, ebx ) ) do


			mov( 0, (type byte [eax+ebx]) );


		endfor;
The chapter on arrays, later in this text, discusses additional ways to deal with blocks of memory.
2.9 The INC and DEC Instructions
As the example in the last section indicates, indeed, as several examples up to this point have indicated, adding or subtracting one from a register or memory location is a very common operation. In fact, this operation is so common that Intel's engineer's included a pair of instructions to perform these specific operations: the INC (increment) and DEC (decrement) instructions.
The INC and DEC instructions use the following syntax:
inc( mem/reg );

dec( mem/reg );
The single operand can be any legal eight-bit, 16-bit, or 32-bit register or memory operand. The INC instruction will add one to the specified operand, the DEC instruction will subtract one from the specified operand.
These two instructions are slightly more efficient (they are smaller) than the corresponding ADD or SUB instructions. There is also one slight difference between these two instructions and the corresponding ADD or SUB instructions: they do not affect the carry flag.
As an example of the INC instruction, consider the example from the previous section, recoded to use INC rather than ADD:
	malloc( 128 );

		for( mov( 0, ebx ); ebx < 128; inc( ebx ) ) do


			mov( 0, (type byte [eax+ebx]) );


		endfor;
2.10 Obtaining the Address of a Memory Object
In the section "The Register Indirect Addressing Modes" on page 143 this chapter discusses how to use the address-of operator, "&", to take the address of a static variable16. Unfortunately, you cannot use the address-of operator to take the address of an automatic variable (one you declare in the VAR section), you cannot use it to compute the address of an anonymous variable, nor can you use this operator to take the address of a memory reference that uses an indexed or scaled indexed addressing mode (even if a static variable is part of the address expression). You may only use the address-of operator to take the address of a static variable that uses the displacement-only memory addressing mode. Often, you will need to take the address of other memory objects as well; fortunately, the 80x86 provides the load effective address instruction, LEA, to give you this capability.
The LEA instruction uses the following syntax17:
lea( reg32, Memory_operand );The first operand must be a 32-bit register, the second operand can be any legal memory reference using any valid memory addressing mode. This instruction will load the address of the specified memory location into the register. This instruction does not modify the value of the memory operand in any way, nor does it reference that value in memory.
Once you load the effective address of a memory location into a 32-bit general purpose register, you can use the register indirect, indexed, or scaled indexed addressing modes to access the data at the specified memory address. For example, consider the following code:
static

	b:byte; @nostorage;

		byte 7, 0, 6, 1, 5, 2, 4, 3;

			.

			.

			.

	lea( ebx, b );

	for( mov( 0, ecx ); ecx < 8; inc( ecx )) do


		stdout.put( "[ebx+ecx]=", (type byte [ebx+ecx]), nl );


	endwhile;
This code steps through each of the eight bytes following the b label in the STATIC section and prints their values. Note the use of the "[ebx+ecx]" addressing mode. The EBX register holds the base address of the list (that is, the address of the first item in the list) and ECX contains the byte index into the list.
program testCls;

#include( "stdlib.hhf" );

begin testCls;


    // Throw up some text to prove that

    // this program really clears the screen:


    stdout.put

    (

        nl,

        "HLA console.cls() Test Routine", nl

        "------------------------------", nl

        nl

        "This routine will clear the screen and move the cursor to (0,0),", nl

        "then it will print a short message and quit", nl

        nl

        "Press the Enter key to continue:"

    );


    // Make the user hit Enter to continue.  This is so that they

    // can see that the screen is not blank.


    stdin.readLn();


    // Okay, clear the screen and print a simple message:


    console.cls();

    stdout.put( "The screen was cleared.", nl );


end testCls;

program testGotoxy;

#include( "stdlib.hhf" );


var

    x:int16;

    y:int16;


begin testGotoxy;


    // Throw up some text to prove that

    // this program really clears the screen:


    stdout.put

    (

        nl,

        "HLA console.gotoxy() Test Routine", nl,

        "---------------------------------", nl,

        nl,

        "This routine will clear the screen then demonstrate the use", nl,

        "of the gotoxy routine to position the cursor at various", nl,

        "points on the screen.",nl,

        nl,

        "Press the Enter key to continue:"

    );


    // Make the user hit Enter to continue.  This is so that they

    // can control when they see the effect of console.gotoxy.


    stdin.readLn();


    // Okay, clear the screen:


    console.cls();


    // Now demonstrate the gotoxy routine:


    console.gotoxy( 5,10 );

    stdout.put( "(5,10)" );


    console.gotoxy( 10, 5 );

    stdout.put( "(10,5)" );


    mov( 20, x );

    for( mov( 0,y ); y<20; inc(y)) do


        console.gotoxy( y, x );

        stdout.put( "(", x, ",", y, ")" );

        inc( x );


    endfor;


end testGotoxy;

program testGetxy;

#include( "stdlib.hhf" );


var

    x:uns32;

    y:uns32;


begin testGetxy;


    // Begin by getting the current cursor position


    console.getX();

    mov( eax, x );


    console.getY();

    mov( eax, y );


    // Clear the screen and print a banner message:


    console.cls();


    stdout.put

    (

        nl,

        "HLA console.GetX() and console.GetY() Test Routine", nl,

        "--------------------------------------------------", nl,

        nl,

        "This routine will clear the screen then demonstrate the use", nl,

        "of the GetX and GetY routines to reposition the cursor", nl,

        "to its original location on the screen.",nl,

        nl,

        "Press the Enter key to continue:"

    );


    // Make the user hit Enter to continue.  This is so that they

    // can control when they see the effect of console.gotoxy.


    stdin.readLn();


    // Now demonstrate the GetX and GetY routines by calling

    // the gotoxy routine to move the cursor back to its original

    // position.


    console.gotoxy( (type uns16 y), (type uns16 x) );

    stdout.put( "*<- Cursor was originally here.", nl );


end testGetxy;

program testSetOutputAttr;

#include( "stdlib.hhf" );


var

    x:uns32;

    y:uns32;


begin testSetOutputAttr;


    // Clear the screen and print a banner message:


    console.cls();


    console.setOutputAttr( win.fgnd_LightRed | win.bgnd_Black );

    stdout.put

    (

        nl,

        "HLA console.setOutputAttr Test Routine", nl,

        "--------------------------------------", nl,

        nl,

        "Press the Enter key to continue:"

    );


    // Make the user hit Enter to continue.  This is so that they

    // can control when they see the effect of console.gotoxy.


    stdin.readLn();


    console.setOutputAttr( win.fgnd_Yellow | win.bgnd_Blue );

    stdout.put

    (

        "                         ", nl

        " In blue and yellow      ", nl,

        "                         ", nl,

        " Press Enter to continue ", nl

        "                         ", nl

        nl

    );

    stdin.readLn();


    // Note: set the attributes back to black and white when

    // the program exits so the console window doesn't continue

    // displaying text in Blue and Yellow.


    console.setOutputAttr( win.fgnd_White | win.bgnd_Black );


end testSetOutputAttr;

program testFillRect;

#include( "stdlib.hhf" );


var

    x:uns32;

    y:uns32;


begin testFillRect;


    console.setOutputAttr( win.fgnd_LightRed | win.bgnd_Black );

    stdout.put

    (

        nl,

        "HLA console.fillRect Test Routine", nl,

        "---------------------------------", nl,

        nl,

        "Press the Enter key to continue:"

    );


    // Make the user hit Enter to continue.


    stdin.readLn();

    console.cls();


    // Test outputting rectangular blocks of color.

    // Note that the blocks are always filled with spaces,

    // so there is no need to specify a foreground color.


    console.fillRect( 2,  50, 5,  55, ` `, win.bgnd_Black );

    console.fillRect( 6,  50, 9,  55, ` `, win.bgnd_Green );

    console.fillRect( 10, 50, 13, 55, ` `, win.bgnd_Cyan );

    console.fillRect( 14, 50, 17, 55, ` `, win.bgnd_Red );

    console.fillRect( 18, 50, 21, 55, ` `, win.bgnd_Magenta );


    console.fillRect( 2,  60, 5,  65, ` `, win.bgnd_Brown );

    console.fillRect( 6,  60, 9,  65, ` `, win.bgnd_LightGray );

    console.fillRect( 10, 60, 13, 65, ` `, win.bgnd_DarkGray );

    console.fillRect( 14, 60, 17, 65, ` `, win.bgnd_LightBlue );

    console.fillRect( 18, 60, 21, 65, ` `, win.bgnd_LightGreen );


    console.fillRect( 2,  70, 5,  75, ` `, win.bgnd_LightCyan );

    console.fillRect( 6,  70, 9,  75, ` `, win.bgnd_LightRed );

    console.fillRect( 10, 70, 13, 75, ` `, win.bgnd_LightMagenta );

    console.fillRect( 14, 70, 17, 75, ` `, win.bgnd_Yellow );

    console.fillRect( 18, 70, 21, 75, ` `, win.bgnd_White );


    // Note: set the attributes back to black and white when

    // the program exits so the console window doesn't continue

    // displaying text in Blue and Yellow.


    console.setOutputAttr( win.fgnd_White | win.bgnd_Black );


end testFillRect;

program testPutsx;

#include( "stdlib.hhf" );


var

    x:uns32;

    y:uns32;


begin testPutsx;


    // Clear the screen and print a banner message:


    console.cls();


    // Note that console.puts always defaults to black and white text.

    // The following setOutputAttr call proves this.


    console.setOutputAttr( win.fgnd_LightRed | win.bgnd_Black );


    // Display the text in black and white:


    console.puts

    (

        10,

        10,

        "HLA console.setOutputAttr Test Routine"

    );

    console.puts

    (

        11,

        10,

        "--------------------------------------"

    );

    console.puts

    (

        13,

        10,

        "Press the Enter key to continue:"

    );


    // Make the user hit Enter to continue.


    stdin.readLn();


    // Demonstrate the console.putsx routine.

    // Note that the colors set by putsx are

    // "local" to this call.  Hence, the current

    // output attribute colors will not be affected

    // by this call.


    console.putsx

    (

        15,

        15,

        win.bgnd_White | win.fgnd_Blue,

        35,

        "Putsx at (15, 15) of length 35.........."

    );


    console.putsx

    (

        16,

        15,

        win.bgnd_White | win.fgnd_Red,

        40,

        "1234567890123456789012345678901234567890"

    );


    // Since the following is a stdout call, the text

    // will use the current output attribute, which

    // is the red/black attributes set at the beginning

    // of this program.


    console.gotoxy( 23, 0 );

    stdout.put( "Press enter to continue:" );

    stdin.readLn();


    // Note: set the attributes back to black and white when

    // the program exits.


    console.setOutputAttr( win.fgnd_White | win.bgnd_Black );

    console.cls();


end testPutsx;
2.11 Putting It All Together
This chapter discussed the 80x86 address modes and other related topics. It began by discussing the 80x86's register, displacement-only (direct), register indirect, and indexed addressing modes. A good knowledge of these addressing modes and their uses is essential if you want to write good assembly language programs. Although this chapter does not delve deeply into the use of each of these addressing modes, it does present their syntax and a few simple examples of each (later chapters will expand on how you use each of these addressing modes).
After discussing addressing modes, this chapter described how HLA and the operating system organizes your code and data in memory. At this point this chapter also discussed the HLA STATIC, READONLY, STORAGE, and VAR data declaration sections. The alignment of data in memory can affect the performance of your programs; therefore, when discussing this topic, this chapter also described how to properly align objects in memory to obtain the fastest executing code.
One special section of memory is the 80x86 stack. In addition to briefly discussing the stack, this chapter also described how to use the stack to save temporary values using the PUSH and POP instructions (and several variations on these instructions).
To a running program, a variable is really nothing more than a simple address in memory. In an HLA source file, however, you may specify the address and type of an object in memory using powerful address expressions and type coercion operators. These chapter discusses the syntax for these expressions and operators and gives several examples of why you would want to use them.
This chapter concludes by discussing two modules in the HLA Standard Library: the dynamic memory allocation routines (malloc and free).
1Actually, the 80x86 does support addressing modes involving certain 16-bit registers, as mentioned earlier. However, HLA does not support these modes and they are not particularly useful under 32-bit operating systems.
2Note: the term "static" here indicates a STATIC, READONLY, or STORAGE object.
3The effective address is the ultimate address in memory that an instruction will access, once all the address calculations are complete.
4It's $1FFFE, not $FFFF because you could use the indexed addressing mode with a displacement of $FFFF along with the value $FFFF in a 16-bit register.
5A pseudo-opcode is a data declaration statement that emits data to the code section, but isn't a true machine instruction (e.g., BYTE is a pseudo-opcode, MOV is a machine instruction).
6The main reason for encoding machine code using a data directive like byte is to implement machine instructions that HLA does not support (for example, to implement machine instructions added after HLA was written but before HLA could be updated for the new instruction(s).
7MOV is an exception to this rule since HLA emits special code for memory to memory move operations.
8The lifetime of a variable is the point from which memory is first allocated to the point the memory is deallocated for that variable.
9Remember, though, that HLA combines static and data declarations into the same memory segment.
10After all, if the two operand sizes are different this usually indicates an error in the program.
11Also called type casting in some languages.
12If you have a variable immediately following byteVar in this example, the MOV instruction will surely overwrite the value of that variable, whether or not you intend this to happen.
13You'll see why when we cover procedures.
14For example, it is extremely rare for you to need to push and pop the ESP register with the PUSHAD/POPAD instruction sequence.
15HLA provides some other memory allocation and deallocation routines as well. See the HLA Standard Library documentation for more details.
16A static variable is one that you declare in the static, readonly, storage, or data sections of your program.
17Actually, the lea instruction allows the operands to appear in either order since there is no ambiguity. However, the standard syntax is to specify the register as the first operand and the memory location as the second operand.
|