
7.8 Handshaking
Many I/O devices cannot accept data at an arbitrary rate. For example, a Pentium based PC is capable of sending several hundred million characters a second to a printer, but that printer is (probably) unable to print that many characters each second. Likewise, an input device like a keyboard is unable to provide several million keystrokes per second (since it operates at human speeds, not computer speeds). The CPU needs some mechanism to coordinate data transfer between the computer system and its peripheral devices.
One common way to coordinate data transfer is to provide some status bits in a secondary input port. For example, a one in a single bit in an I/O port can tell the CPU that a printer is ready to accept more data, a zero would indicate that the printer is busy and the CPU should not send new data to the printer. Likewise, a one bit in a different port could tell the CPU that a keystroke from the keyboard is available at the keyboard data port, a zero in that same bit could indicate that no keystroke is available. The CPU can test these bits prior to reading a key from the keyboard or writing a character to the printer.
Using status bits to indicate that a device is ready to accept or transmit data is known as handshaking. It gets this name because the protocol is similar to two people agreeing on some method of transfer by a hand shake.
Figure 7.8 shows the layout of the parallel printer port's status register. For the LPT1: printer interface, this port appears at I/O address $379. As you can see from this diagram, bit seven determines if the printer is capable of receiving data from the system; this bit will contain a one when the printer is capable of receiving data.
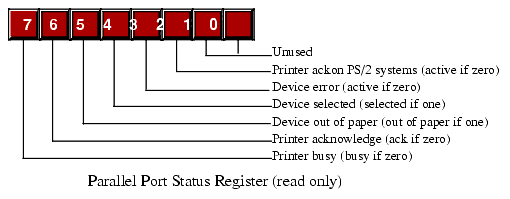
Figure 7.8 The Parallel Port Status Port
The following short program segment will continuously loop while the H.O. bit of the printer status register contains zero and will exit once the printer is ready to accept data:
and( $80, al ); // Clears Z flag if bit seven is set.
// Okay to write another byte to the printer data port here.
The code above begins by setting DX to $379 since this is the I/O address of the printer status port. Within the loop the code reads a byte from the status port (the IN instruction) and then tests the H.O. bit of the port using the AND instruction. Note that logically ANDing the AL register with $80 will produce zero if the H.O. bit of AL was zero (that is, if the byte read from the input port was zero). Similarly, logically anding AL with $80 will produce $80 (a non-zero result) if the H.O. bit of the printer status port was set. The 80x86 zero flag reflects the result of the AND instruction; therefore, the zero flag will be set if AND produces a zero result, it will be reset otherwise. The REPEAT..UNTIL loop repeats this test until the AND instruction produces a non-zero result (meaning the H.O. bit of the status port is set).
One problem with using the AND instruction to test bits as the code above is that you might want to test other bits in AL once the code leaves the loop. Unfortunately, the "and( $80, al );" instruction destroys the values of the other bits in AL while testing the H.O. bit. To overcome this problem, the 80x86 supports another form of the AND instruction - TEST. The TEST instruction works just like AND except it only updates the flags; it does not store the result of the logical AND operation back into the destination register (AL in this case). One other advantage to TEST is that it only reads its operands, so there are less problems with data hazards when using this instruction (versus AND). Also, you can safely use the TEST instruction directly on read-only memory-mapped I/O ports since it does not write data back to the port. As an example, let's recode the previous loop using the TEST instruction:
test( $80, al ); // Clears Z flag if bit seven is set.
// Okay to write another byte to the printer data port here.
Once the H.O. bit of the printer status port is set, it's okay to transmit another byte to the printer. The computer can make a byte available by storing the byte data into I/O address $378 (for LPT1:). However, simply storing data to this port does not inform the printer that it can take the byte. The system must complete the other half of the handshake operation and send the printer a signal to indicate that a byte is available.
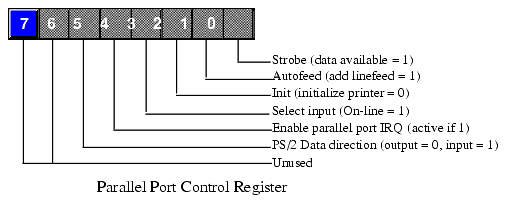
Figure 7.9 The Parallel Port Command Register
Bit zero (the strobe line) must be set to one and then back to zero when the CPU makes data available for the printer (the term "strobe" suggests that the system pulses this line in the command port). In order to pulse this bit without affecting the other control lines, the CPU must first read this port, OR a one into the L.O. bit, write the data to the port, then mask out the L.O. bit using an AND instruction, and write the final result back to the control port again. Therefore, it takes three accesses (a read and two writes) to send the strobe to the printer. The following code handles this transmission:
mov( $378, dx ); // Data port address
mov( Data2Xmit, al ); // Send the data to the printer.
mov( $37a, dx ); // Point DX at the control port.
in( dx, al ); // Get the current port setting.
or( 1, al ); // Set the L.O. bit.
out( al, dx ); // Set the strobe line high.
and( $fe, al ); // Clear the L.O. bit.
out( al, dx ); // Set the strobe line low.
The code above would normally follow the REPEAT..UNTIL loop in the previous example. To transmit a second byte to the printer you would jump back to the REPEAT..UNTIL loop and wait for the printer to consume the current byte.
Note that it takes a minimum of five I/O port accesses to transmit a byte to the printer use the code above (minimum one IN instruction in the REPEAT..UNTIL loop plus four instructions to send the byte and strobe). If the parallel port is connected to the ISA bus, this means it takes a minimum of five microseconds to transmit a single byte; that works out to less than 200,000 bytes per second. If you are sending ASCII characters to the printer, this is far faster than the printer can print the characters. However, if you are sending a bitmap or a Postscript file to the printer, the printer port bandwidth limitation will become the bottleneck since it takes considerable data to print a page of graphics. For this reason, most graphic printers use a different technique than the above to transmit data to the printer (some parallel ports support DMA in order to get the data transfer rate up to a reasonable level).
7.9 Time-outs on an I/O Port
One problem with the REPEAT..UNTIL loop in the previous section is that it could spin indefinitely waiting for the printer to become ready to accept additional input. If someone turns the printer off or the printer cable becomes disconnected, the program could freeze up, forever waiting for the printer to become available. Usually, it's a good idea to indicate to the user that something has gone wrong rather than simply freezing up the system. A typical way to handle this problem is using a time-out period to determine that something is wrong with the peripheral device.
With most peripheral devices you can expect some sort of response within a reasonable amount of time. For example, most printers will be ready to accept additional character data within a few seconds of the last transmission (worst case). Therefore, if 30 seconds or more have passed since the printer was last willing to accept a character, this is probably an indication that something is wrong. If the program could detect this, then it could ask the user to check the printer and tell the program to resume printing once the problem is resolved.
Choosing a good time-out period is not an easy task. You must carefully balance the irritation of having the program constantly ask you what's wrong when there is nothing wrong with the printer (or other device) with the program locking up for long periods of time when there is something wrong. Both situations are equally annoying to the end user.
Any easy way to create a time-out period is to count the number of times the program loops while waiting for a handshake signal from a peripheral. Consider the following modification to the REPEAT..UNTIL loop of the previous section:
dec( ecx ); // Count down to see if the time-out has expired.
breakif( @z ); // Leave this loop if ecx counted down to zero.
test( $80, al ); // Clears Z flag if bit seven is set.
// Okay to write another byte to the printer data port here.
The code above will exit once the printer is ready to accept data or when approximately 30 seconds have expired. You may question the 30 second figure. After all, a software based loop (counting down ECX to zero) should run a different speeds on different processors. However, don't miss the fact that there is an IN instruction inside this loop. The IN instruction reads a port on the ISA bus and that means this instruction will take approximately one microsecond to execute (about the fastest operation on the ISA bus). Hence, every one million times through the loop will take about a second (±50%, but close enough for our purposes). This is true regardless of the CPU frequency.
The 80x86 provides a couple of instructions that are quite useful for implementing time-outs in a polling loop: LOOPZ and LOOPNZ. We'll consider the LOOPZ instruction here since it's perfect for the loop above. The LOOPZ instruction decrements the ECX register by one and falls through to the next instruction if ECX contains zero. If ECX does not contain zero, then this instruction checks the zero flag setting prior to decrementing ECX; if the zero flag was set, then LOOPZ transfers control to a label specified as LOOPZ's operand. Consider the implementation of the previous REPEAT..UNTIL loop using LOOPZ:
test( $80, al ); // Clears Z flag if bit seven is set.
loopz PollingLoop; // Repeat while zero and ECX<>0.
// Okay to write another byte to the printer data port here.
Notice how this code doesn't need to explicitly decrement ECX and check to see if it became zero.
Warning: the LOOPZ instruction can only transfer control to a label with ±127 bytes of the LOOPZ instruction. Due to a design problem, HLA cannot detect this problem. If the branch range exceeds 127 bytes HLA will not report an error. Instead, the underlying assembler (e.g., MASM or Gas) will report the error when it assembles HLA's output. Since it's somewhat difficult to track down these problems in the MASM or Gas listing, the best solution is to never use the LOOPZ instruction to jump more than a few instructions in your code. It's perfect for short polling loops like the one above, it's not suitable for branching large distances.
|