
Chapter Five Bit Manipulation
5.1 Chapter Overview
Manipulating bits in memory is, perhaps, the thing that assembly language is most famous for. Indeed, one of the reasons people claim that the "C" programming language is a "medium-level" language rather than a high level language is because of the vast array of bit manipulation operators that it provides. Even with this wide array of bit manipulation operations, the C programming language doesn't provide as complete a set of bit manipulation operations as assembly language.
This chapter will discuss how to manipulate strings of bits in memory and registers using 80x86 assembly language. This chapter begins with a review of the bit manipulation instructions covered thus far and it also introduces a few new instructions. This chapter reviews information on packing and unpacking bit strings in memory since this is the basis for many bit manipulation operations. Finally, this chapter discusses several bit-centric algorithms and their implementation in assembly language.
5.2 What is Bit Data, Anyway?
Before describing how to manipulate bits, it might not be a bad idea to define exactly what this text means by "bit data." Most readers probably assume that "bit manipulation programs" twiddle individual bits in memory. While programs that do this are definitely "bit manipulation programs," we're not going to limit this title to just those programs. For our purposes, bit manipulation refers to working with data types that consist of strings of bits that are non-contiguous or are not an even multiple of eight bits long. Generally, such bit objects will not represent numeric integers, although we will not place this restriction on our bit strings.
A bit string is some contiguous sequence of one or more bits (this term even applies if the bit string's length is an even multiple of eight bits). Note that a bit string does not have to start or end at any special point. For example, a bit string could start in bit seven of one byte in memory and continue through to bit six of the next byte in memory. Likewise, a bit string could begin in bit 30 of EAX, consume the upper two bits of EAX, and then continue from bit zero through bit 17 of EBX. In memory, the bits must be physically contiguous (i.e., the bit numbers are always increasing except when crossing a byte boundary, and at byte boundaries the byte number increases by one). In registers, if a bit string crosses a register boundary, the application defines the continuation register but the bit string always continues in bit zero of that second register.
A bit set is a collection of bits, not necessarily contiguous (though it may be), within some larger data structure. For example, bits 0..3, 7, 12, 24, and 31 from some double word object forms a set of bits. Usually, we will limit bit sets to some reasonably sized container object (that is, the data structure that encapsulates the bit set), but the definition doesn't specifically limit the size. Normally, we will deal with bit sets that are part of an object no more than about 32 or 64 bits in size. Note that bit strings are special cases of bit sets.
A bit run is a sequence of bits with all the same value. A run of zeros is a bit string containing all zeros, a run of ones is a bit string containing all ones. The first set bit in a bit string is the bit position of the first bit containing a one in a bit string, i.e., the first `1' bit following a possible run of zeros. A similar definition exists for the first clear bit. The last set bit is the last bit position in a bit string containing that contains `1'; afterwards, the remainder of the string forms an uninterrupted run of zeros. A similar definition exists for the last clear bit.
A bit offset is the number of bits from some boundary position (usually a byte boundary) to the specified bit. As noted in Volume One, we number the bits starting from zero at the boundary location. If the offset is less than 32, then the bit offset is the same as the bit number in a byte, word, or double word value.
A mask is a sequence of bits that we'll use to manipulate certain bits in another value. For example, the bit string %0000_1111_0000, when used with the AND instruction, can mask away (clear) all the bits except bits four through seven. Likewise, if you use this same value with the OR instruction, it can force bits four through seven to ones in the destination operand. The term "mask" comes from the use of these bit strings with the AND instruction; in those situations the one and zero bits behave like masking tape when you're painting something; they pass through certain bits unchanged while masking out the other bits.
Armed with these definitions, we're ready to start manipulating some bits!
5.3 Instructions That Manipulate Bits
Bit manipulation generally consists of six activities: setting bits, clearing bits, inverting bits, testing and comparing bits, extracting bits from a bit string, and inserting bits into a bit string. By now you should be familiar with most of the instructions we'll use to perform these operations; their introduction started way back in the earliest chapters of Volume One. Nevertheless, it's worthwhile to review the old instructions here as well as present the few bit manipulation instructions we've yet to consider.
The most basic bit manipulation instructions are the AND, OR, XOR, NOT, TEST, and shift and rotate instructions. Indeed, on the earliest 80x86 processors, these were the only instructions available for bit manpulation. The following paragraphs review these instructions, concentrating on how you could use them to manipulate bits in memory or registers.
The AND instruction provides the ability to strip away unwanted bits from some bit sequence, replacing the unwanted bits with zeros. This instruction is especially useful for isolating a bit string or a bit set that is merged with other, unrelated data (or, at least, data that is not part of the bit string or bit set). For example, suppose that a bit string consumes bit positions 12 through 24 of the EAX register, we can isolate this bit string by setting all other bits in EAX to zero by using the following instruction:
and( %1_1111_1111_1111_0000_0000_0000, eax );Most programs use the AND instruction to clear bits that are not part of the desired bit string. In theory, you could use the OR instruction to mask all unwanted bits to ones rather than zeros, but later comparisons and operations are often easier if the unneeded bit positions contain zero.
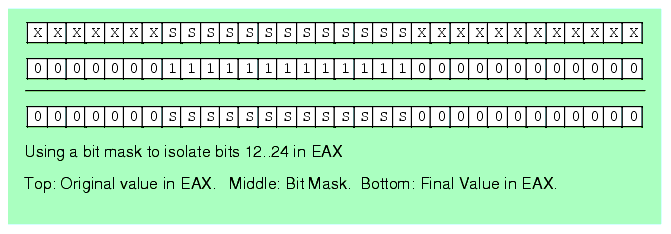
Figure 5.1 Isolating a Bit String Using the AND Instruction
Once you've cleared the unneeded bits in a set of bits, you can often operate on the bit set in place. For example, to see if the string of bits in positions 12 through 24 of EAX contain $12F3 you could use the following code:
		and( %1_1111_1111_1111_0000_0000_0000, eax );

		cmp( eax, %1_0010_1111_0011_0000_0000_0000 );
Here's another solution, using constant expressions, that's a little easier to digest:
		and( %1_1111_1111_1111_0000_0000_0000, eax );

		cmp( eax, $12F3 << 12 );  // "<<12" shifts $12F3 to the left 12 bits.
Most of the time, however, you'll want (or need) the bit string aligned with bit zero in EAX prior to any operations you would want to perform. Of course, you can use the SHR instruction to properly align the value after you've masked it:
		and( %1_1111_1111_1111_0000_0000_0000, eax );

		shr( 12, eax );

		cmp( eax, $12F3 );

		<< Other operations that requires the bit string at bit #0 >>
Now that the bit string is aligned to bit zero, the constants and other values you use in conjunction with this value are easier to deal with.
You can also use the OR instruction to mask unwanted bits around a set of bits. However, the OR instruction does not let you clear bits, it allows you to set bits to ones. In some instances setting all the bits around your bit set may be desirable; most software, however, is easier to write if you clear the surrounding bits rather than set them.
The OR instruction is especially useful for inserting a bit set into some other bit string. To do this, there are several steps you must go through:
- Clear all the bits surrounding your bit set in the source operand.
- Clear all the bits in the destination operand where you wish to insert the bit set.
- OR the bit set and destination operand together.
For example, suppose you have a value in bits 0..12 of EAX that you wish to insert into bits 12..24 of EBX without affecting any of the other bits in EBX. You would begin by stripping out bits 13 and above from EAX; then you would strip out bits 12..24 in EBX. Next, you would shift the bits in EAX so the bit string occupies bits 12..24 of EAX. Finally, you would OR the value in EAX into EBX (see Figure 5.2):
		and( $1FFF, eax );      // Strip all but bits 0..12 from EAX

		and( $1FF_F000, ebx );  // Clear bits 12..24 in EBX.

		shl( 12, eax );         // Move bits 0..12 to 12..24 in EAX.

		or( eax, ebx );         // Merge the bits into EBX.

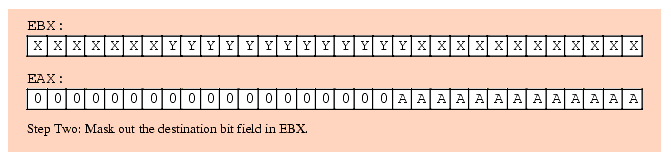
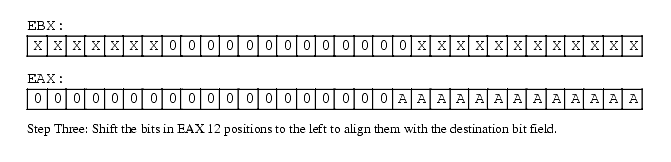
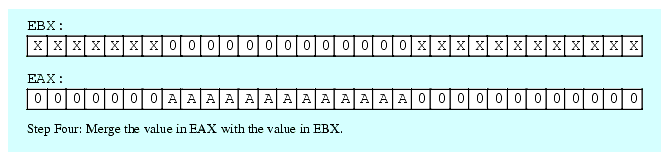
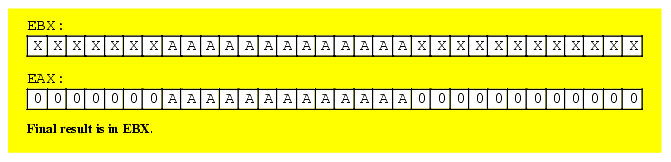
Figure 5.2 Inserting Bits 0..12 of EAX into Bits 12..24 of EBX
In this example the desired bits (AAAAAAAAAAAAA) formed a bit string. However, this algorithm still works fine even if you're manipulating a non-contiguous set of bits. All you've got to do is to create an appropriate bit mask you can use for ANDing that has ones in the appropriate places.
When working with bit masks, it is incredibly poor programming style to use literal numeric constants as in the past few examples. You should always create symbolic constants in the HLA CONST (or VAL) section for your bit masks. Combined with some constant expressions, you can produce code that is much easier to read and maintain. The current example code is more properly written as:
const

	StartPosn: 12;

	BitMask: dword := $1FFF << StartPosn;   // Mask occupies bits 12..24

		.

		.

		.

		shl( StartPosn, eax );   // Move into position.

		and( BitMask, eax );     // Strip all but bits 12..24 from EAX

		and( !BitMask, ebx ); // Clear bits 12..24 in EBX.

		or( eax, ebx );          // Merge the bits into EBX.
Notice the use of the compile-time not operator ("!") to invert the bit mask in order to clear the bit positions in EBX where the code inserts the bits from EAX. This saves having to create another constant in the program that has to be changed anytime you modify the BitMask constant. Having to maintain two separate symbols whose values are dependent on one another is not a good thing in a program.
Of course, in addition to merging one bit set with another, the OR instruction is also useful for forcing bits to one in a bit string. By setting various bits in a source operand to one you can force the corresponding bits in the destination operand to one by using the OR instruction.
The XOR instruction, as you may recall, gives you the ability to invert selected bits belonging to a bit set. Although the need to invert bits isn't as common as the need to set or clear them, the XOR instruction still sees considerable use in bit manipulation programs. Of course, if you want to invert all the bits in some destination operand, the NOT instruction is probably more appropriate than the XOR instruction; however, to invert selected bits while not affecting others, the XOR is the way to go.
One interesting fact about XOR's operation is that it lets you manipulate known data in just about any way imaginable. For example, if you know that a field contains %1010 you can force that field to zero by XORing it with %1010. Similarly, you can force it to %1111 by XORing it with %0101. Although this might seem like a waste, since you can easily force this four-bit string to zero or all ones using AND or OR, the XOR instruction has two advantages: (1) you are not limited to forcing the field to all zeros or all ones;, you can actually set these bits to any of the 16 valid combinations via XOR; (2) if you need to manipulate other bits in the destination operand at the same time, AND/OR may not be able to accommodate you. For example, suppose that you know that one field contains %1010 that you want to force to zero and another field contains %1000 and you wish to increment that field by one (i.e., set the field to %1001). You cannot accomplish both operations with a single AND or OR instruction, but you can do this with a single XOR instruction; just XOR the first field with %1010 and the second field with %0001. Remember, however, that this trick only works if you know the current value of a bit set within the destination operand. Of course, while you're adjusting the values of bit fields containing known values, you can invert bits in other fields simultaneously.
In addition to setting, clearing, and inverting bits in some destination operand, the AND, OR, and XOR instructions also affect various condition codes in the FLAGs register. These instructions affect the flags as follows:
- These instructions always clear the carry and overflow flags.
- These instructions set the sign flag if the result has a one in the H.O. bit; they clear it otherwise. I.e., these instructions copy the H.O. bit of the result into the sign flag.
- These instructions set/clear the zero flag depending on whether the result is zero.
- These instructions set the parity flag if there are an even number of set bits in the L.O. byte of the destination operand, they clear the parity flag if there are an odd number of one bits in the L.O. byte of the destination operand.
The first thing to note is that these instructions always clear the carry and overflow flags. This means that you cannot expect the system to preserve the state of these two flags across the execution of these instructions. A very common mistake in many assembly language programs is the assumption that these instructions do not affect the carry flag. Many people will execute an instruction that sets/clears the carry flag, execute an AND/OR/XOR instruction, and then attempt to test the state of the carry from the previous instruction. This simply will not work.
One of the more interesting aspects to these instructions is that they copy the H.O. bit of their result into the sign flag. This means that you can easily test the setting of the H.O. bit of the result by testing the sign flag (using SETS/SETNS, JS/JNS, or by using the @S/@NS flags in a boolean expression). For this reason, many assembly language programmers will often place an important boolean variable in the H.O. bit of some operand so they can easily test the state of that bit using the sign flag after a logical operation.
We haven't talked much about the parity flag in this text. Indeed, earlier volumes have done little more than acknowledge its existence. We're not going to get into a big discussion of this flag and what you use it for since the primary purpose for this flag has been taken over by hardware1. However, since this is a chapter on bit manipulation and parity computation is a bit manipulation operation, it seems only fitting to provide a brief discussion of the parity flag at this time.
Parity is a very simple error detection scheme originally employed by telegraphs and other serial communication schemes. The idea was to count the number of set bits in a character and include an extra bit in the transmission to indicate whether that character contained an even or odd number of set bits. The receiving end of the transmission would also count the bits and verify that the extra "parity" bit indicated a successful transmission. We're not going to explore the information theory aspects of this error checking scheme at this point other than to point out that the purpose of the parity flag is to help compute the value of this extra bit.
The 80x86 AND, OR, and XOR instructions set the parity bit if the L.O. byte of their operand contains an even number of set bits. An important fact bears repeating here: the parity flag only reflects the number of set bits in the L.O. byte of the destination operand; it does not include the H.O. bytes in a word, double word, or other sized operand. The instruction set only uses the L.O. byte to compute the parity because communication programs that use parity are typically character-oriented transmission systems (there are better error checking schemes if you transmit more than eight bits at a time).
Although the need to know whether the L.O. (or only) byte of some computation has an even or odd number of set bits isn't common in modern programs, it does come in useful once in a great while. Since this is, intrinsically, a bit operation, it's worthwhile to mention the use of this flag and how the AND/OR/XOR instructions affect this flag.
The zero flag setting is one of the more important results the AND/OR/XOR instructions produce. Indeed, programs reference this flag so often after the AND instruction that Intel added a separate instruction, TEST, whose main purpose was to logically AND two results and set the flags without otherwise affecting either instruction operand.
There are three main uses of the zero flag after the execution of an AND or TEST instruction: (1) checking to see if a particular bit in an operand is set; (2) checking to see if at least one of several bits in a bit set is one; and (3) checking to see if an operand is zero. Use (1) is actually a special case of (2) where the bit set contains only a single bit. We'll explore each of these uses in the following paragraphs.
A common use for the AND instruction, and also the original reason for the inclusion of the TEST instruction in the 80x86 instruction set, is to test to see if a particular bit is set in a given operand. To perform this type of test, you would normally AND/TEST a constant value containing a single set bit with the operand you wish to test. These clears all the other bits in the second operand leaving a zero in the bit position under test (the bit position with the single set bit in the constant operand) if the operand contains a zero in that position and leaving a one if the operand contains a one in that position. Since all of the other bits in the result are zero, the entire result will be zero if that particular bit is zero, the entire result will be non-zero if that bit position contains a one. The 80x86 reflects this status in the zero flag (Z=1 indicates a zero bit, Z=0 indicates a one bit). The following instruction sequence demonstrates how to test to see if bit four is set in EAX:
		test( %1_000, eax );  // Check bit #4 to see if it is 0/1

		if( @nz ) then


			<< Do this if the bit is set >>


		else


			<< Do this if the bit is clear >>


		endif;
You can also use the AND/TEST instructions to see if any one of several bits is set. Simply supply a constant that has one bits in all the positions you want to test (and zeros everywhere else). ANDing such a value with an unknown quantity will produce a non-zero value if one or more of the bits in the operand under test contain a one. The following example tests to see if the value in EAX contains a one in bit positions one, two, four, and seven:
		test( %1001_0010, eax );

		if( @nz ) then // at least one of the bits is set.


			<< do whatever needs to be done if one of the bits is set >>


		endif;
Note that you cannot use a single AND or TEST instruction to see if all the corresponding bits in the bit set are equal to one. To accomplish this, you must first mask out the bits that are not in the set and then compare the result against the mask itself. If the result is equal to the mask, then all the bits in the bit set contain ones. You must use the AND instruction for this operation as the TEST instruction does not mask out any bits. The following example checks to see if all the bits corresponding to a value this code calls bitMask are equal to one:
		and( bitMask, eax );

		cmp( eax, bitMask );

		if( @e ) then


			<< All the bit positions in EAX corresponding to the set >>

			<< bits in bitMask are equal to one if we get here.      >>


		endif;
Of course, once we stick the CMP instruction in there, we don't really have to check to see if all the bits in the bit set contain ones. We can check for any combination of values by specifying the appropriate value as the operand to the CMP instruction.
Note that the TEST/AND instructions will only set the zero flag in the above code sequences if all the bits in EAX (or other destination operand) have zeros in the positions where ones appear in the constant operand. This suggests another way to check for all ones in the bit set: invert the value in EAX prior to using the AND or TEST instruction. Then if the zero flag is set, you know that there were all ones in the (original) bit set, e.g.,
		not( eax );

		test( bitMask, eax );

		if( @z ) then


			<< At this point, EAX contained all ones in the bit positions >>

			<< occupied by ones in the bitMask constant.                  >>


		endif;
The paragraphs above all suggest that the bitMask (i.e., source operand) is a constant. This was for purposes of example only. In fact, you can use a variable or other register here, if you prefer. Simply load that variable or register with the appropriate bit mask before you execute the TEST, AND, or CMP instructions in the examples above.
Another set of instructions we've already seen that we can use to manipulate bits are the bit test instructions. These instructions include BT (bit test), BTS (bit test and set), BTC (bit test and complement), and BTR (bit test and reset). We've used these instructions to manipulate bits in HLA character set variables, we can also use them to manipulate bits in general. The BTx instructions allow the following syntactical forms:
					btx( BitNumber, BitsToTest );


					btx( reg16, reg16 );

					btx( reg32, reg32 );

					btx( constant, reg16 );

					btx( constant, reg32 );


					btx( reg16, mem16 );

					btx( reg32, mem32 );

					btx( constant, mem16 );

					btx( constant, mem32 );
The BT instruction's first operand is a bit number that specifies which bit to check in the second operand. If the second operand is a register, then the first operand must contain a value between zero and the size of the register (in bits) minus one; since the 80x86's largest registers are 32 bits, this value have the maximum value 31 (for 32-bit registers). If the second operand is a memory location, then the bit count is not limited to values in the range 0..31. If the first operand is a constant, it can be any eight-bit value in the range 0..255. If the first operand is a register, it has no limitation.
The BT instruction copies the specified bit from the second operand into the carry flag. For example, the "bt( 8, eax );" instruction copies bit number eight of the EAX register into the carry flag. You can test the carry flag after this instruction to determine whether bit eight was set or clear in EAX.
In general, the BT instruction is, perhaps, not the best instruction for testing individual bits in a register. The TEST (or AND) instruction is a bit more efficient. These latter two instructions are Intel "RISC Core" instructions while the BT instruction is a "Complex" instruction. Therefore, you will often get better performance using TEST or AND rather than BT. If you want to test bits in memory operands (especially in bit arrays), then the BT instruction is probably a reasonable way to go.
The BTS, BTC, and BTR instructions manipulate the bit they test while they are testing it. These instructions are rather slow and you should avoid them if performance is your primary concern. In a later volume when we discuss semaphores you will see the true purpose for these instructions. Until then, if performance (versus convenience) is an issue, you should always try two different algorithms, one that uses these instructions, one that uses AND/OR instructions, and measure the performance difference; then choose the best of the two different approaches.
The shift and rotate instructions are another group of instructions you can use to manipulate and test bits. Of course, all of these instructions move the H.O. (left shift/rotate) or L.O. (right shift/rotate) bits into the carry flag. Therefore, you can test the carry flag after you execute one of these instructions to determine the original setting of the operand's H.O. or L.O. bit (depending on the direction). Of course, the shift and rotate instructions are invaluable for aligning bit strings, packing, and unpacking data. Volume One has several examples of this and, of course, some earlier examples in the section also use the shift instructions for this purpose.
5.4 The Carry Flag as a Bit Accumulator
The BTx, shift, and rotate instructions all set or clear the carry flag depending on the operation and/or selected bit. Since these instructions place their "bit result" in the carry flag, it is often convenient to think of the carry flag as a one-bit register or accumulator for bit operations. In this section we will explore some of the operations possible with this bit result in the carry flag.
Instructions that will be useful for manipulating bit results in the carry flag are those that use the carry flag as some sort of input value. The following is a sampling of such instructions:
- ADC, SBB
- RCL, RCR
- CMC (we'll throw in CLC and STC even though they don't use the carry as input)
- JC, JNC
- SETC, SETNC
The ADC and SBB instructions add or subtract their operands along with the carry flag. So if you've computed some bit result into the carry flag, you can figure that result into an addition or subtraction using these instructions. This isn't a common operation, but it is available if it's useful to you.
To merge a bit result in the carry flag, you most often use the rotate through carry instructions (RCL and RCR). These instructions, of course, move the carry flag into the L.O. or H.O. bits of their destination operand. These instructions are very useful for packing a set of bit results into a byte, word, or double word value.
The CMC (complement carry) instruction lets you easily invert the result of some bit operation. You can also use the CLC and STC instructions to initialize the carry flag prior to some string of bit operations involving the carry flag.
Of course, instructions that test the carry flag are going to be very popular after a calculation that leaves a bit result in the carry flag. The JC, JNC, SETC, and SETNC instructions are quite useful here. You can also use the HLA @C and @NC operands in a boolean expression to test the result in the carry flag.
If you have a sequence of bit calculations and you would like to test to see if the calculations produce a specific sequence of one-bit results, the easiest way to do this is to clear a register or memory location and use the RCL or RCR instructions to shift each result into that location. Once the bit operations are complete, then you can compare the register or memory location against a constant value to see if you've obtained a particular result sequence. If you want to test a sequence of results involving conjunction and disjunction (i.e., strings of results involving ANDs and ORs) then you could use the SETC and SETNC instruction to set a register to zero or one and then use the AND/OR instructions to merge the results.
1Serial communications chips and other communication hardware that uses parity for error checking normally computes the parity in hardware, you don't have to use software for this purpose.
|